Why Use Edge Banding on DIY Projects?
Do you have a DIY project involving plywood or veneer, and you’re aiming for a finished, solid wood feel? Learning how to apply edge banding can help elevate your project. Edge banding serves a crucial function in providing a polished look to the plywood edge or veneer.
Applying edge banding conceals substrate defects, hides the plywood layers, and prevents splinters, hence improving the overall aesthetic and functionality of the piece. Notably, it enhances your project’s longevity as the edges of the plywood are often more vulnerable to damage. If your project involves a workbench or any type of furniture, edge banding is synonymous with good results, and overlooking it, can result in a less-than-professional finish.
Types of Edge Banding Materials to Consider
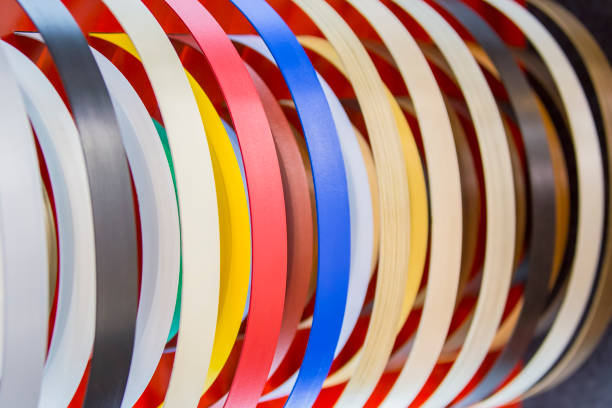
The world of edge banding is rich with many options to align with your project needs. The core options you’ll come across include PVC, ABS, acrylic, veneer, and solid wood. Each has its strengths and limitations.
For instance, wood veneer edge banding offers a seamless finish that matches the wood grain of your project perfectly. You could opt for a red oak or cherry wood veneer edge banding, with good results hinging on the quality and species of the solid piece of wood. Another commendable consideration is the adhesive-backed, or ‘iron-on’ edge banding. It typically consists of a narrow strip of wood with hot-melt adhesive on the flat side—perfect for DIYers.
| Edge Banding Material | Pros | Cons |
| PVC | Durable, flexible, low cost, moisture and heat resistant | Not as eco-friendly, can have a plastic appearance |
| ABS | More eco-friendly than PVC, has similar physical properties to PVC, flexible and durable | A bit more expensive than PVC, not as heat resistant as PVC |
| Acrylic | High transparency, resistant to UV radiation, can mimic glass appeal | Not as impact resistant as PVC or ABS, prone to scratching, can be more expensive |
| Veneer | Can match the wood grain of the project, natural appearance, can be stained or painted | Requires careful application, can be expensive depending on the wood species, potentially less moisture and heat resistant than synthetic options |
| Solid Wood | High-quality appearance, very durable, can be refinished multiple times | More challenging to apply, expensive, potential for wood movement due to humidity changes |
| Adhesive-Backed / Iron-On | Easy application, good for DIY projects, can come in a variety of materials | Adhesive quality can vary, heat is required for application, durability will depend on the specific material of the edge banding |
Choosing the Right Edge Banding for Your Project
Choosing the right edge banding for your project is a significant aspect of succeeding in your DIY project. Several factors come into play, such as the type of plywood you’re using, the project design, and your project’s intended use.
For a harmonious look, choose an edge banding that matches your plywood or veneer. Consider the wood veneer edge banding if you want to replicate a solid wood feel in terms of texture and grain.
Nonetheless, consider the thickness, the adhesive method (pre-glued or non-glued), and the finishing requirements. Whether you are edge banding plywood with hardwood or applying edge banding to MDF, consider the project’s longevity, compatibility with your tools, cost, and desired aesthetic.
Preparing the Edge Before Application
Before learning how to use edge banding, it’s essential to prepare the substrate properly. This involves sanding down your plywood or veneer edges. Employ a sanding block or utility knife to create a slight angle on the substrate’s top edge. This eases the application of the edge banding as it alleviates sharp edges.
Next, eliminate any dust residue from the substrate, using a slightly damp cloth. The edge should be clean, smooth, and ready for the edge banding application.
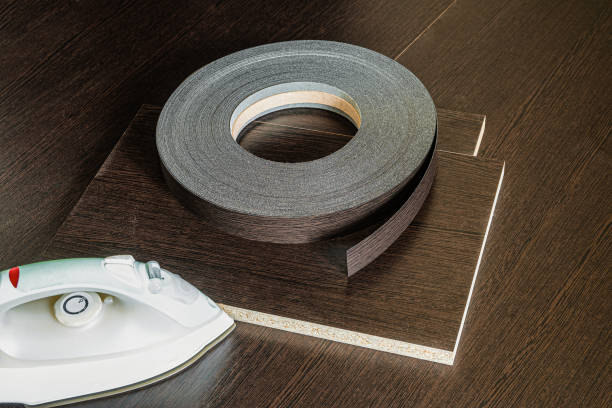
Using Iron-on Adhesive Edge Banding
The “iron-on” approach is a popular technique when applying edge banding, especially for DIY projects. This type of edge banding typically has a width of about 13/16 inches and comes pre-glued. This reduces the work of applying glue separately before the installation.
Start by measuring the required length of edge banding, adding a little bit more to take care of the overhang. You can use scissors to cut the edge banding to a suitable length. Once cut, align the banding with the edge of your plywood and apply a household iron or a cheap iron on the banding strip.
The heat from the iron activates the adhesive, causing it to bond with the plywood edge. Apply downward pressure as you move the iron along the banding strip, ensuring a reliable bond.
Applying Hot Melt Adhesive Edge Banding
If you choose the hot melt adhesive edge banding, the application process differs slightly from the iron-on. This banding type requires a hot melt glue roller or a glue gun to apply the glue at the edge of your plywood.
This method, though more labor-intensive than the iron-on technique, is quite popular due to its robust bond. Be sure to warm up the adhesive appropriately before beginning the process and apply a consistent layer of adhesive along the edge of your board.

Tips for Applying Edge Banding to Corners
Applying edge banding to corners can prove more complicated than using a flat edge. The key trick is to trim and band each edge independently.
If you have a squared corner, gently apply the edge banding, starting with the longer edge first, using a block of wood to ensure solid adhesion. For flush and beveled corners, it is best to use an edge-trimming tool to trim the banding for a perfect fit. The process of how to install edge banding also involves clamping the trimmer under heat to allow the adhesive to cure properly.
Trimming and Finishing the Edges After Application
After the application process, you’ll have a small excess edge banding overhanging the sides of your plywood. You must trim this excess off to achieve a smooth finish. Tools such as a utility knife, sharp chisel, or an edge trimmer come in handy in removing the excess edge banding.
Post-trimming, sand the edges down with fine sandpaper or sanding block for a seamless finish. Apply slight pressure to ensure the edge banding sits perfectly flush with the plywood edge, providing the illusion of a single, solid block of wood.
Achieving a Professional Look with Edge Banding
Utilizing the right tools and materials, you can accomplish the professional finish of a carpenter in your DIY project.
To achieve a seamless transition, try some red oak or cherry stain on the edges; it will accentuate the grain structure similar to a real piece of solid wood.
Also, by using a router with a flush trim bit as your edge-trimming tool, you can yield an absolute professional finish to your projects, providing uniform wear and avoiding minor defects.

Common Mistakes to Avoid When Applying Edge Banding
Despite sounding simple, applying edge banding can get intricate, especially for beginners. Missteps like rushing the process, setting the iron too hot or not adequately heating the iron-on edge banding for plywood can lead to unsatisfactory results.
Understandably, the last step you want to take is rushing through the process. Ensure the adhesive has fully melted and has time to cool and bond accurately before you begin trimming the edges.
Remember, achieving good results involves observing the rules, like correctly aligning the banding with the edge of the plywood, ensuring a make-clean cut using scissors, and effectively applying the edge banding to corners.
Edge Banding Options for Curved Surfaces
Apart from straight and cornered edges, edge banding also extends to curved surfaces. If your DIY project involves rounding the corners or if you’re working with a curved surface, flexible edge banding comes to your rescue.
When applying edge banding on a curved surface, you might need to apply additional heat and pressure to ensure proper bonding. Always remember to maintain the alignment as you proceed around the curve.
Maintaining and Repairing Edge Banding Over Time
With time, edge banding might show signs of wear and tear, or the adhesive might start to give way. However, maintenance and repair are not complex tasks. Pre-glued edge banding or hot-melt adhesive edge banding can be repaired using a simple clothes iron.
If the area of damage is significant, you may have to remove the old banding and apply a new one using your household iron. For minor repairs, run a hot iron over the loose spots and apply slight downward pressure to re-establish the bond.

Conclusion – Edge Banding Elevates DIY Projects
There you have it; a comprehensive guide on how to apply edge banding to your DIY projects. With edge banding, you can all but guarantee a professional finish to your DIY projects, regardless of whether you are a seasoned veteran or just starting. The benefits of learning how to use edge banding are substantial, from the enhancement of aesthetic appeal to augmenting the lifespan of your project.
Remember, the venture into edge banding requires patience, some practice, and a keen eye for detail. And above all else, it’s about having fun while doing it. Happy DIY-ing!


