Every doorway contains a simple yet essential door hinge which functions as its uncelebrated backbone. Every doorway contains this pivotal point that enables privacy and passage through silent operation. The smooth functioning of doors stops abruptly when hinges fail which causes both annoyance and the unsettling sensation that something is wrong. This complete resource explains door hinge structure while teaching you to identify typical issues and shows you how to measure and replace components and provides information about better hinge alternatives. Whether you are a homeowner grappling with a squeaky door or a business professional seeking a reliable supplier for large-scale projects, this guide will serve as your definitive resource.
Anatomy of a Door Hinge: Key Parts Explained
A door hinge reveals its complex internal structure when exposed to view. The hinge system demonstrates an elegant design structure which proves its operational excellence. To truly understand how to address hinge-related issues, we must first familiarize ourselves with its fundamental components.
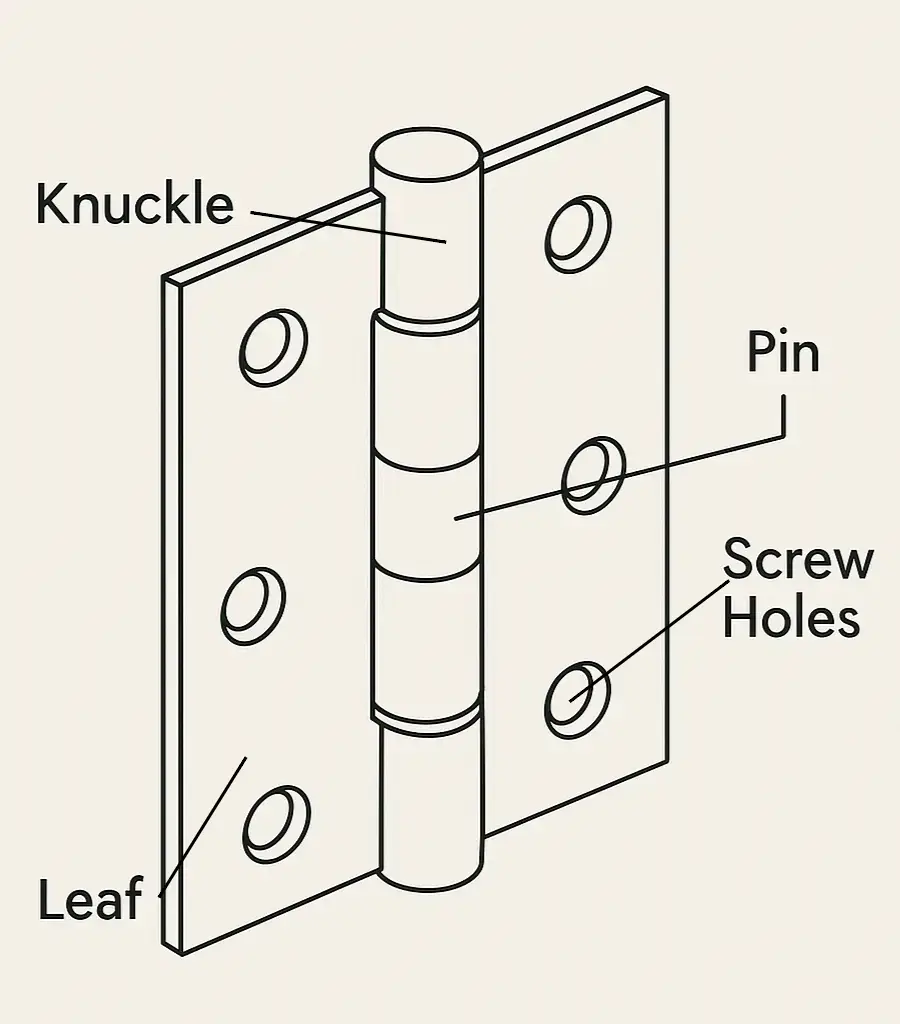
- Leaf : The main body of the hinge consists of two flat metal plates known as leaves. The rectangular shape of each leaf contains screw holes which serve to connect it to both door and frame. The wings of this mechanical creature function as secure mounting surfaces.
- Knuckle : Each leaf contains knuckles which are cylindrical segments that interlock with each other along one edge. These knuckles from both leaves mesh together, creating a central channel. The hinge design alongside its intended load determines the number of knuckles it will have. The number of knuckles in a hinge indicates its strength level. The knuckles from each leaf interlock form the pin housing which maintains proper alignment during rotation.
- Pin : The cylindrical door hinge pin functions as the pivot point by passing through the aligned knuckles to enable door swinging motion. The pin serves as the essential connector between leaves because it enables rotational movement. It is the spine of the hinge, providing the axis for its function.The crucial component that connects the two leaves and allows the door to pivot open and closed.
- Screw Hole : The hinge leaves contain pre-drilled screw holes which serve to attach the hinge to the door and frame through screws. The number of screw holes and their placement on the hinge allows secure attachment to both door and frame which ensures stability and prevents detachment.
The fundamental structure of hinges stays the same but different variations, leading to various types of hinges, exist among them. Security-enhancing hinges include models with fixed pins that cannot be removed from their position. Some hinge designs include removable pins that provide benefits for door removal operations. The number of knuckles found on a hinge serves as an indicator of its capacity to handle weight loads. Understanding these nuances allows for a more informed approach to hinge selection and maintenance.
Different Types of Door Hinges: An Overview
Before delving into the various parts of a door hinge, it’s essential to recognize some common types of door hinges.Each door type along with its applications needs specific hinge types to fulfill their functional and design requirements. The main door hinge categories include the following:
- Butt Hinge: The standard door hinge type is known as the Butt Hinge. The hinge contains two rectangular metal pieces which link through a central pin. The hinge system consists of two leaves that attach to the door frame and door respectively, which enables the door to swing in one direction. Butt hinges serve as a basic hinge design which makes them simple to install and they find widespread use for both interior and exterior wooden and metal doors.
- Leaf Hinge/Strap Hinge: Leaf Hinge/Strap Hinge features elongated leaf components which resemble flags or straps thus earning their names. Leaf hinges surpass the strength of butt hinges to bear heavier door loads, which makes them suitable for gate applications and barn doors and decorative door installations. The installation connection area becomes larger because of their extended leaf structure.
- Concealed Hinge/Invisible Hinge: This hinge type disappears completely when doors close because it remains hidden from view thus creating a contemporary aesthetic. The structure of concealed hinges includes multiple linkages which are installed within the door leaf and frame. These hinges find their applications in luxury homes and contemporary interior doors and flush wall installations.
- Pivot Hinge: Pivot Hinges operate by installing them at door top and bottom points to enable vertical axis rotation. The(1) hinge type finds application in heavy door installations and frameless doors and special door opening systems including revolving doors. The pivot points on these hinges exist beyond the door’s edge boundary.
- Double Action Hinge/Spring Hinge: The double-action hinge or spring hinge enables doors to open in two directions while its spring mechanism automatically closes the door after users release it. Double-action hinges serve commercial spaces including restaurant kitchens and bars because they enable two-directional traffic flow.
- Specialty Hinges: In addition to the common types mentioned above, there are also specialty hinges designed for specific applications, such as:
- T-Hinge: The leaves of this hinge are T-shaped and are often used for shed doors and toolbox lids.
- Continuous Hinge/Piano Hinge: It extends to match door length for delivering uniform support. These hinges find their applications in demanding strength requirements and unique opening systems such as folding doors and equipment compartment doors.
Understanding these different types of door hinges and their main characteristics will help us better comprehend the subsequent discussion about hinge parts.
Diagnosing Common Hinge Problems & Needed Parts
Door hinges which experience continuous use develop multiple operational issues similar to other mechanical components. The first step to solve a problem requires identifying its specific nature to determine both the required solution and replacement components. The following list presents typical hinge issues alongside the relevant replacement components:
- Door Sagging: Door sagging develops because pins or knuckles become worn out which increases play and allows doors to drop. Sagging occurs due to loose or stripped screw holes. To fix this problem you should replace the worn pin or the entire hinge when knuckles show significant damage or place shims behind the hinge leaf attached to the door or frame to achieve alignment. The installation requires longer screws or thicker ones when screw holes have minor looseness.
- Squeaking or Grinding Noise: A squeaking or grinding noise emerges from the pin and knuckles’ friction because of insufficient lubrication or rust or bending damage. The application of WD-40 or silicone spray on pins and knuckles usually starts the repair process when a leaf shows slight bending. The noise continues if the pin is bent so it needs replacement or extensive rust or damage requires a complete hinge replacement.
- Door Binding or Not Closing Properly: The door fails to close properly or binds when it meets the frame because of leaf bending from impact or misalignment from loose or damaged pins or loose screws that allow the hinge to shift. The first step should be to tighten all screws. However, if this does not resolve the issue the knuckles may be damaged or deformed. Check the leaves for bending while trying to fix them gently before proceeding with further inspection. Replacement of the pin becomes necessary when it shows signs of looseness or damage. The hinge requires replacement when its structure becomes too badly damaged.
- Pin Walking Out: A slightly bent or damaged pin causes pin walking out because it fails to properly fit inside the knuckles. Wear on the knuckles can lead to this problem together with a damaged pin. The standard solution involves using a new pin of matching size. The market offers replacement pins that feature textured surfaces or small heads to stop them from falling out. A temporary solution for this problem can be achieved by carefully using a hammer and nail set to tap the existing pin back into place.
- Loose or Stripped Screw Holes: You can resolve loose or stripped screw holes by using longer or thicker screws or by fixing the damaged or weakened wood around the screw holes. Wood glue-soaked toothpicks or wooden matchsticks serve as a solution for fixing stripped screw holes by inserting them into the hole before screw tightening. To fix severely stripped holes, you should consider using screw hole repair kits or relocating the hinge slightly and drilling new pilot holes.
The knowledge of how door issues relate to particular hinge components enables you to handle repairs with increased competence and speed.
How to Measure for Compatible Replacement Parts
The process of finding compatible replacement parts starts by completing the diagnosis and part identification stage. The wrong selection of hinge parts during ordering will create additional problems which delay your project. Accurate measurement stands as the essential foundation for achieving a successful repair.
The following procedure demonstrates how to measure door hinge components for replacement purposes:
- To replace a damaged pin you must determine its diameter through measurement. A vernier caliper provides the most precise method to perform this measurement. Standard wrenches with their jaws closed can help you determine the closest fit when measuring for replacement parts and a ruler will help you measure the wrench opening. Take the measurement of the pin from its widest section.
- Total pin length measurement should extend from one end to the other.
- Determine the thickness of one hinge leaf through measurement. A vernier caliper stands as the best tool for this measurement task. When using a ruler for measurement, keep your focus on obtaining the most precise reading possible.
- To measure leaf height, use a ruler to determine the vertical distance between the top and bottom of a single hinge leaf along its spine which contains the knuckles.
- The width of a fully opened hinge leaf should be measured by placing it flat to obtain its dimensions. The distance between the hinge spine and leaf outer edge defines this measurement.
- The measurement of screw hole center-to-center distance enables you to match the screw positions on your new hinge with existing holes on your door and frame. Use a ruler to determine the distance between the middle points of successive screw holes that run along the leaf’s length. The measurement process requires horizontal and vertical assessments based on the screw hole arrangement.
Accurate measurements require proper tools as their foundation. The vernier caliper delivers the most exact measurements when determining small dimensions such as pin diameters and leaf thicknesses. A standard measuring tape or ruler serves adequately to determine length, height and width measurements.
The success of a hinge replacement depends entirely on precise measurements. A minor difference in dimensions between the new part and its intended space will cause installation failure which results in unnecessary expenses for the wrong purchase. Measuring with precision at this stage will prevent future problems that could have been avoided.
The last step requires careful observation of all details. Record the shape of the corners on the hinge leaves. Are they square or rounded? When the shape is rounded you should attempt to determine its radius. Note the arrangement of screw holes as well as their pattern. What is the total number of holes and how do they exist in relation to one another? Additional compatibility assurance comes from matching these details.
Step-by-Step: Replacing Common Hinge Parts
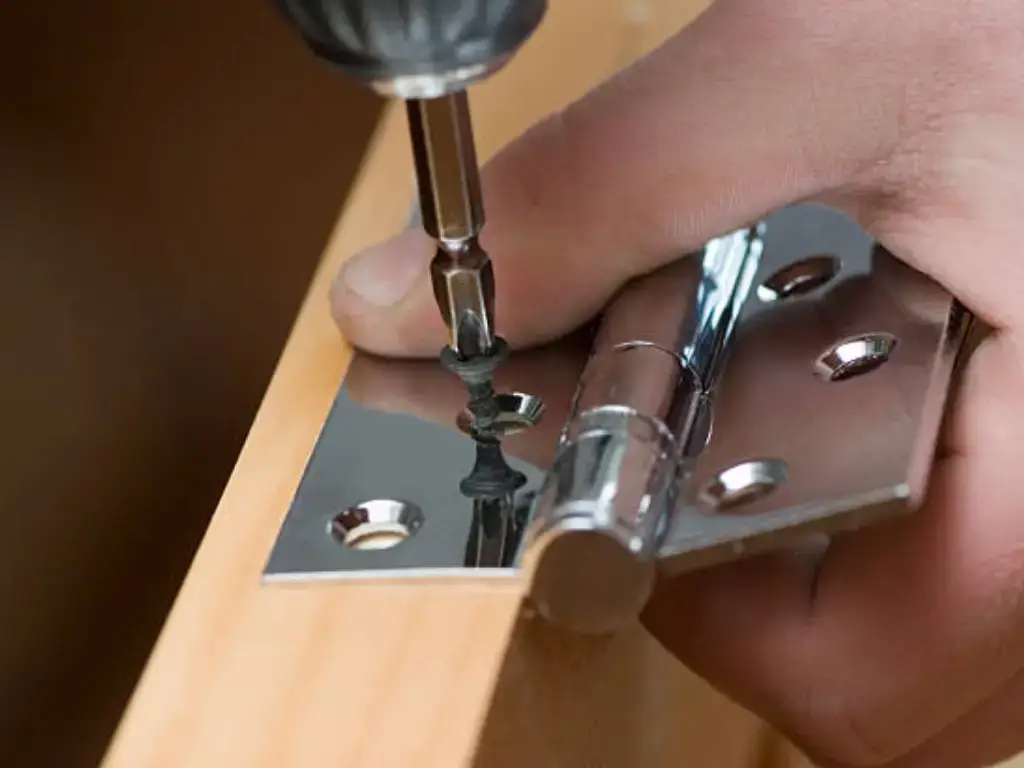
The next step after obtaining proper replacement components involves performing the actual replacement work. The repair of standard problems such as squeaky hinges and walking pins requires simple tools to perform the fixes.
Replacing a HingePin:
- Gather Your Tools: You will need a hammer together with a nail set or punch and possibly WD-40 as lubricant to complete this task.
- Support the Door: To stop the door from moving while you remove the pin position a door stopper or ask someone to hold the door in place.
- Remove the Old Pin: Position the nail set or punch tip on the bottom pin head of the hinge. Use the hammer to strike the nail set end which will push the pin upward. You can apply lubricant to the stuck pin then wait for several minutes before another attempt to extract it.
- Remove the Pin Completely: You should remove the pin entirely by hand when it reaches a sufficient level of looseness.
- Insert the New Pin: Align the knuckles of the hinge leaves and insert the new pin from the top.
- Tap the Pin Down: If necessary, use the hammer and nail set to gently tap the new pin down until it is fully seated and flush with the top of the hinge.
Installing Shims to Adjust Door Position:
- Identify the Problem Area: Determine which part of the door is rubbing or sagging. This will indicate which hinge needs shimming.
- Gather Your Materials: You will need cardboard or thin wood shims and a screwdriver.
- Loosen the Hinge Screws: Slightly loosen the screws on the hinge leaf that needs shimming (either on the door or the frame side). Do not remove them completely.
- Insert the Shims: Slide the shims behind the hinge leaf. Start with one shim and check the door’s alignment. Add more shims as needed until the door hangs correctly and no longer rubs.
- Tighten the Screws: Once the door is properly aligned, carefully tighten all the hinge screws.
- Test the Door: Open and close the door several times to ensure it swings smoothly and closes properly. You may need to make minor adjustments by adding or removing shims.
Wear safety glasses at all times when using tools during your work. Support the door properly before you remove any hinge pins to stop it from unexpectedly falling or swinging, which could result in injury or damage.
Upgrade Your Hinges: Better Parts, Better Function
When repairing your malfunctioning hinge, you should evaluate the possibility of upgrading to better parts, which will boost both performance and lifespan. Upgrading hinges in busy areas and doors requiring special features proves to be a valuable investment.
- Replacing Standard Pins with Ball Bearing Pins
- Upgrading to Security Stud/Pin Hinges for Outward Swinging Doors
- Using Higher Grade Stainless Steel Parts (e.g., SUS304 or SUS316) for Damp Environments or Outdoors
- Ball Bearing Pins
- Security Stud/Pin Hinges
- Higher Grade Stainless Steel Parts
Hinge Part Materials & Finishes: What to Choose?

The material and finish of your door hinge parts not only affect their aesthetic appeal but also play a crucial role in their strength, durability, and resistance to corrosion. Understanding the different options available will help you make informed choices based on your specific needs and environment.
| Material | Strength | Durability | Rust Resistance | Cost | Suitable Environments |
| Steel | Good | Good | Low | Low | Dry Indoor |
| Stainless Steel 304 | Good | Excellent | Good | Medium | Humid Indoor, Some Outdoor |
| Stainless Steel 316 | Good | Excellent | Excellent | High | Harsh Outdoor, Coastal, Marine |
| Brass | Good | Good | Good | Medium | Indoor (Aesthetic Focus) |
| Zinc Alloy | Fair | Fair | Good | Very Low | Dry Indoor (Light Use) |
Beyond the base material, the surface finish also plays a role in both aesthetics and corrosion resistance. Different types of hinge may also influence the available finishes. Common finishes include:
- Brushed Nickel: Offers a subtle, modern look with a slightly matte finish.
- Oil-Rubbed Bronze: Provides a rich, dark, and often textured finish, popular in traditional and rustic styles.
- Matte Black: A contemporary choice that offers a bold and contrasting look.
- Polished Brass: A classic, shiny finish that can add a touch of elegance.
- Chrome: A durable and shiny finish that is easy to clean and often used in modern settings.
When choosing a finish, consider the existing hardware in your home, such as door handles, knobs, and other fixtures, to create a cohesive and visually appealing look.For enhanced functionality in certain type of hinge, internal components like bushings can also contribute to smoother operation.
By understanding the different materials and finishes available for door hinge parts, you can make informed decisions that balance durability, functionality, aesthetics, and budget, ensuring your doors operate smoothly and look their best for years to come.
Choosing the Right Door Hinge Supplier: Key Considerations
Businesses and professionals who work with construction and renovation or furniture manufacturing must make a strategic supplier selection for door hinge because it directly affects product quality and cost-effectiveness and project timelines. The following factors should guide your selection of a door hinge supplier:
- Product Quality and Certifications: The durability and reliability of door hinges stands as the most essential factor. Look for suppliers who prioritize quality and can provide certifications (such as ISO9001) or material testing reports to validate the strength and finish of their products. Consider the standards for different materials and surface treatments relevant to your needs.
- Product Range and Specifications: A suitable supplier should provide a wide range of hinge types together with various sizes and materials and finish options to accommodate your multiple requirements.Inquire about their ability to provide custom solutions or specialized hinges if needed.
- Price Competitiveness: While quality is crucial, price is also a significant factor. Compare pricing across different suppliers, considering the overall value proposition, including quality and service. Inquire about bulk discounts and long-term partnership incentives.
- Minimum Order Quantity (MOQ) and Lead Time: Assess whether the supplier’s MOQ aligns with your order volume. Evaluate their lead times and ensure they are reliable and can accommodate your project schedules.
- Supply Chain Stability and Production Capacity: Choose a supplier with a stable supply chain and sufficient production capacity to meet your ongoing needs and handle large orders. Inquire about their manufacturing capabilities and contingency plans.
- After-Sales Service and Technical Support: Select a supplier who maintains a stable supply chain system and possesses enough manufacturing capacity to fulfill both current and future business requirements and large-scale orders. Ask about their production capacity together with their backup plans.
- Reputation and Track Record: Research the supplier’s reputation in the industry by checking online reviews, seeking recommendations, and potentially requesting references from other clients. A supplier with a proven history of successful business operations demonstrates their reliability.
- Geographical Location and Logistics: Consider the supplier’s location in relation to your operations and the efficiency of their logistics network. This can impact shipping costs and delivery times.
- Collaboration and Flexibility: Look for a supplier who is willing to build a long-term collaborative relationship and demonstrates flexibility in accommodating your specific needs and adapting to market changes.
Choosing the right door hinge supplier is a critical decision that can significantly impact your business. Your business success depends on forming partnerships through careful evaluation of product quality alongside production capacity and cost-effectiveness and reliability. The hinge supply options from Maxave become more attractive because they demonstrate massive production capabilities while improving efficiency by 50% in galvanizing and maintaining a 99.2% quality standard for their products. The value proposition of their services increases due to their optimized packaging approach, which enables up to 35% reduction in shipping costs. Maxave demonstrates their product quality and customer satisfaction commitment through their performance guarantee which provides complete refunds for defective items thus establishing themselves as a powerful market player in furniture hardware supply.


