Introduction to Woodworking Repairs
Pull up a stool, my friend. I’ve spent more than a score of years surrounded by the scent of freshly cut timber and the gleam of polished wood. Woodworking is more than a trade; it’s an art, graced with the essence of history and functionality. For us woodworkers, the satisfaction of smooth surfaces and perfectly joined pieces is second to none. But let’s be real: not all woodwork is about creating new masterpieces—sometimes it’s about breathing new life into an old friend.
Filling screw holes in wood may not sound like the most glamorous of tasks, yet it is a fundamental skill that anyone with a knack for home improvement should master. Repairing these little imperfections keeps your wood looking its best and maintains its integrity. From dowels to wood putty and everything in between, we will talk about how to fill screw holes in wood, ensuring those finishes remain flawless.
Importance of Properly Filling Screw Holes
Imagine a fine heirloom dresser passed down through generations, each wear and crease telling a tale. Now think of a screw hole stripped of its purpose, marring its surface. When left unaddressed, it can mean more than just an eyesore—it may lead to further damage or weakening of the wood. It’s not about hiding our mistakes; it’s about perfecting our craft. So when it comes to filler, glue, sawdust, or whichever tool you reach for, remember that properly filling those voids means maintaining the story without marring the narrative.
What Do You Need for Your Workspace?
When gearing up for the task at hand, make sure your workspace is as prepared as you are. If you’re looking to fill screw holes in wood, your arsenal should include the likes of wood filler, putty knives, various grits of sandpaper, hammers, and possibly even a good wood dowel or two. Oh, and let’s not forget glue—but make sure it’s the right type. Wood glue is your ally here, creating bonds that make your fixes as durable as the original wood.
Safety Measures and Precautions
Before we dive into the nitty-gritty, let’s talk safety. I can’t emphasize enough how these goggles have saved me more than just a splinter in the eye. And while I might sound like your granddad reminding you to wear your jacket, trust me, in a room full of flying sawdust and chunks of scrap wood, you’ll thank me later. Respirators, gloves, and a tidy space—these are your true companions in the realm of DIY projects and home improvements.
Techniques for Filling Screw Holes in Wood
Method 1: Using Sawdust and PVA Glue
Now for a touch of creativity. If you’ve got some sawdust from the same type of wood you’re repairing, mix it with PVA glue to create a thick paste. This homespun filler will have the closest possible color match to your original wood surface. Plus, it’s an economical and eco-friendly solution to boot.
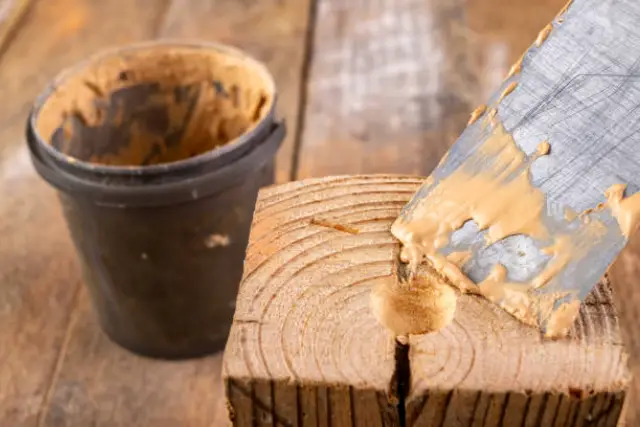
Method 2: Applying Wood Filler
Wood filler is like the Swiss army knife of woodworking—it’s versatile, it’s easy to use, and with a plethora of types available, you can choose one that suits your project’s needs. Apply it with a putty knife and smooth it over. Once dry, sand it down, and voila, it’s as if that hole never existed.
Method 3: Using Wood Screw Anchors
In the dance of durability and strength, sometimes the floor needs reinforcement. Enter wood screw anchors—the unsung heroes—when you’re looking to repair screw holes in wood that have been stripped bare. Slip in a plastic anchor, and suddenly, you’ve got a solid base for your new screw. It’s like rewinding the clock and getting a second chance to do it right this time.
Method 4: Toothpick and Glue Method
Don’t scoff at the humble wooden toothpick; it’s a trick as old as time, and I’d wager it’s saved more projects than fancy solutions. Dip a few toothpicks in wood glue and insert them into the hole until it’s filled. Snap off the excess, let it dry, and then, with a bit of sanding, you’re set. It’s quick and efficient, and your wallet won’t feel a thing.
Method 5: Utilizing Thicker Screws
Sometimes, the simplest answer is the right one. If the hole’s too large, simply opting for a longer screw or one with a larger diameter can save the day. It’s like choosing a thicker branch to support a swing—common sense, really.
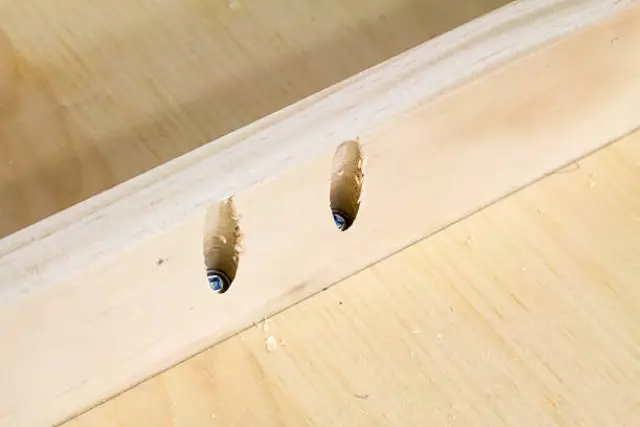
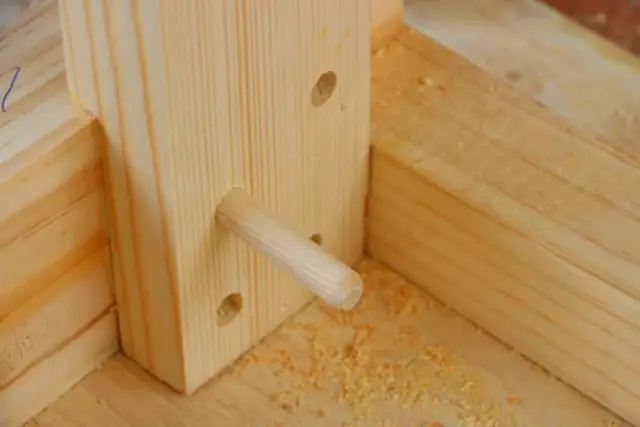
Method 6: Wood Plugs and Dowels
When you’ve got gaping holes to contend with, wood plugs or dowels are your best friends. Select a wooden dowel with the same diameter as your hole, cover it in glue, tap it in, and once it’s dry, saw off the excess flush with the wood surface. A bit of a stain to match your wood, and you’ve got yourself a repair that’s as sound as the heart of oak.
Method 7: Epoxy Resin for Larger Holes
Epoxy resin might not have the old-school charm of sawdust and glue, but it has its place. It’s the go-to for larger cavities where traditional fillers might falter. Mix in some hardener, apply it to the hole, and allow it to set. It’s a modern solution that’s as strong as it is reliable—just give it time to cure before you start sanding.
Method 8: Shellac Sticks for Small Imperfections
Shellac sticks are like the fine brushes of an artist—used for those minute final touches. Heat a bit of the stick and drip it into smaller holes or imperfections, then smooth it over with a chisel. It’s a delicate process that asks for a steady hand and a keen eye, but the results can be akin to turning rough sketch lines into smooth curves.
Method 9: Homemade Solutions with Wood Glue
Got some wood glue and leftover sawdust or shavings? You’re in business. Creating a homemade wood filler from these ingredients can fill those tiny nail holes or small gaps that other methods might overlook. It’s like whipping up a batch of pancakes from scratch—satisfying, simple, and effective.
| Method | Brief Steps | Advantages | Potential Issues |
| Using Sawdust and PVA Glue | Mix sawdust with PVA glue to form a paste and apply it to the hole. | Eco-friendly, color-matching | May not be as durable |
| Applying Wood Filler | Apply with a putty knife and sand once dry. | Easy to use, versatile | Requires proper color match |
| Using Wood Screw Anchors | Insert a plastic anchor, then a new screw. | Solid base for screws | Not suitable for larger holes |
| Toothpick and Glue Method | Insert glue-dipped toothpicks and break off the excess. | Simple, cost-effective | Not ideal for large holes |
| Utilizing Thicker Screws | Replace it with a longer or wider screw. | Quick, straightforward | Limited by hole size |
| Wood Plugs and Dowels | Insert the glued dowel and saw off excess. | Strong, aesthetically pleasing | Requires precise sizing |
| Epoxy Resin for Larger Holes | Mix and apply resin, let it set. | Strong hold for large holes | Longer setting time |
| Shellac Sticks for Small Imperfections | Heat and apply the stick, smooth with a chisel. | Perfect for small flaws | Requires precision and patience |
| Homemade Solutions with Wood Glue | Mix wood glue with sawdust and apply. | Customizable, simple | Not as strong as other methods |
Tips for Achieving Professional Results
Mastering the craft of woodworking requires perseverance and meticulousness, embedded within years of relentless practice. With time, artisans have crafted techniques capable of significantly augmenting their craftwork. A cardinal rule that always holds true is “measure twice, cut once”—pin-point precision remains an indispensable aspect. It is pivotal to never expedite the preparatory work; it forms the backbone for all subsequent stages. Sanding should perpetually be carried out in alignment with the direction of the wood fibers to persistently preserve the integrity of the surface under work. If uncertainty arises, delve into a scholarly tutorial or glean from the expansive repository of knowledge in textual resources or digital platforms.
Troubleshooting Common Issues
During the process of utilizing wood filler or screw anchors, one might stumble upon complications, especially with more visually distinct, darker types of wood where the contrast may be considerably vivid. To accomplish an unblemished finish, contemplate the application of staining or painting techniques to the filled regions to seamlessly integrate with the surrounding area of the wood. At times, your filler might demonstrate subpar adhesion, often attributable to inadequate drying durations. Hence, patience becomes paramount, particularly with substantially larger or deeper screw cavities. A paramount reminder is that a dry, lucid day acts as your confederate in expediting the drying process. In instances of severely deteriorated or mold-infested wood, the easiest solution might be a comprehensive replacement.
Crafting Perfection: The Final Touch in Woodworking
As we conclude our immersive exploration in the detailed realm of integrating screw holes, always bear in mind that the quintessence of woodworking is embodied in the minutiae. This is not merely a matter of rectifying a piece of wood; it’s centred around sketching a narrative—your individual narrative. Every skillfully concealed screw hole offers a chance to harmonise practicality with artistic inventiveness. Whether your objectives align with a design that commands attention with clashing filler hues or a flawless, unnoticeable restoration, the decision remains personal.
Embrace the liberty to innovate. An adeptly implemented repair can transcend a rudimentary home improvement endeavour into a masterful creation. Data suggests that DIY zealots are pursuing more than mere functionality; they crave the gratification that stems from manifesting something uniquely personal. So, as you seize your instruments, retain the cognizance that each stroke, every selection of filler, and every final touch is a tribute to your proficiency and vision. Good luck, and may each piece of wood you interact with echo the sophistication and ardor of authentic craftsmanship.


