Understanding Drawer Slides: A Key Component
When it comes to cabinet and furniture construction, drawers play an essential role in providing functional storage space. Building a drawer with slides is a fundamental skill for any DIY enthusiast or woodworker. Drawer slides, also known as drawer glides, ensure smooth and effortless operation of the drawers. In this comprehensive guide, we will take you through the step-by-step process of building a drawer with slides, enabling you to create functional and aesthetically pleasing drawers for your projects.
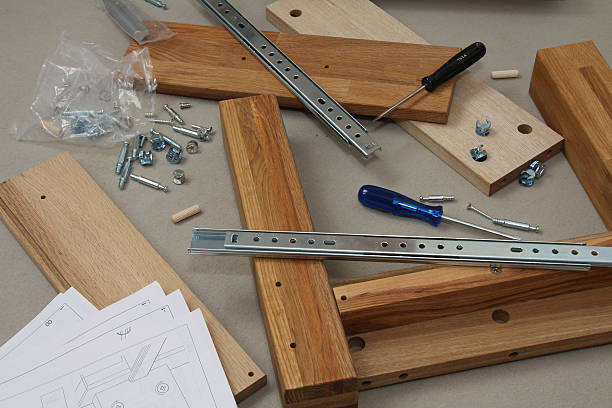
Gathering Materials and Tools: What You’ll Need?
Before diving into the construction process, gathering the necessary materials and tools is essential for a smooth workflow. Here’s a list of items you’ll need for building a drawer with slides:
- Plywood: Choose a suitable plywood for the drawer box, keeping in mind factors like thickness, durability, and aesthetics.
- Drawer slides: Measure the dimensions of your cabinet opening and select appropriate drawer slides that match the available space and desired extension.
- Wood glue: High-quality wood glue ensures a strong bond between the drawer components.
- Pocket Screws: Use appropriate wood screws to secure the drawer slides and assemble the drawer box.
- Saw: A table saw or a circular saw is necessary for cutting the plywood to size.
- Measuring tools: Accurate measurements are crucial when building drawers. Use a tape measure, square, and ruler for precise inch calculations.
- Router: A router is handy for creating dadoes and making precise cuts. And a router table is needed if necessary.
- Pocket hole jig: If you prefer pocket hole joinery, a pocket hole jig helps create strong and concealed joints.
- Clamps: Clamps assist in holding the drawer components together during assembly.
- Drill: A drill is necessary for creating pilot holes and screwing components together.
Ensure you have all the necessary materials and tools ready before starting the construction process to ensure efficiency and accuracy.
Planning Your Drawer Layout: Detailed Insights
Embarking on a woodworking project such as learning how to build a drawer box can be an exciting endeavor. As you’ve gathered your materials and gained a clear understanding of the role and function of drawer slides, it’s time to delve into the critical phase of planning your drawer layout. One could argue that meticulous planning is the backbone of successful drawer design, setting the stage for all subsequent steps in the building process.
Firstly, it’s essential to establish the dimensions of the drawer box. You need to consider the width, height, and depth of the cabinet, nightstand, or any other piece of furniture you’re planning to augment with your new drawer. Remember, the cabinet’s depth will dictate the depth of your drawer box, and the cabinet’s height will influence the possible height of your drawer.

When crafting your drawer box for the first time, it’s crucial to give ample thought to clearance – the extra space you need to allow for around all sides of the drawer box. This clearance ensures smooth operation and prevents the drawer box from scratching or getting stuck in the furniture. Consider using digital tools or traditional pen and paper to visualize the final drawer box within its intended setting, taking into account these clearances.
A prudent strategy for beginners in this woodworking journey is to consult a drawer design tutorial. This can provide guidance and valuable insights, potentially helping you sidestep common pitfalls and mistakes. With careful planning and by paying attention to these essential considerations, you can set the groundwork for your successful drawer-building project.
Calculating Drawer Front Sizes: Inset vs. Overlay
Determining the size of the drawer front is crucial to achieving a balanced and aesthetically pleasing look. Two common methods for installing drawer fronts are inset and overlay.
- Inset Drawer Fronts: With inset drawer fronts, the front panel is set inside the cabinet frame, creating a flush and seamless appearance. To calculate the size of an inset drawer front, subtract the overlay of the drawer slides from the opening width. This ensures that the drawer front fits perfectly within the cabinet frame.
- Overlay Drawer Fronts: Overlay drawer fronts are positioned outside the cabinet frame, overlapping the edges of the frame. To determine the size of an overlay drawer front, add the overlay desired on all sides to the opening width. This produces a larger drawer front that covers a portion of the cabinet frame.
Consider the style and functionality you want to achieve when deciding between inset and overlay drawer fronts. Ensure that the calculated sizes provide a proportional and balanced look to your cabinetry project.

Measuring and Mounting the Drawer Slides
Accurate measurement and proper installation of the drawer slides are crucial for smooth and reliable drawer operation. Follow these steps to measure and mount the drawer slides correctly:
Step 1: Measure the height of the drawer slide and mark this distance on the inside of the cabinet walls. This ensures that the slides are positioned at an equal height on both sides.
Step 2: Position the first slide on one drawer side, aligning it with the marked height measurement. Secure the slide to the cabinet using the appropriate screws.
Step 3: Repeat the process for the second slide on the opposite side of the drawer, ensuring that it is aligned with the first slide. Double-check the levelness and parallelism of the slides using a measuring tool.
Step 4: Mount the corresponding drawer slides onto the side of the drawer box, ensuring they are aligned with the slides attached to the cabinet. Use screws to secure the slides to the drawer box.
Step 5: Test the fit and smoothness of the drawer slides by sliding the drawer box into the cabinet. Make any necessary adjustments to ensure proper alignment and smooth operation.
Properly installed drawer slides are the foundation of functional and reliable drawers. Take your time to measure accurately and align the slides correctly for optimal results.
Selecting the Right Drawer Slides: Ball Bearing vs Roller Bearing
Understanding how to build a drawer with slides involves a key decision: choosing the appropriate type of drawer slides. The choice between ball-bearing slides and roller-bearing slides will have a significant impact on the durability, load-bearing capacity, and ease of installation of your DIY cabinet drawer.
Ball-bearing slides have become a popular choice for woodworking enthusiasts and professionals alike due to their high durability. They consist of ball bearings that provide a smooth gliding action, offering excellent performance even under heavier loads. This makes them a fantastic choice for larger pieces of furniture where a sturdier drawer is necessary.
| Features | Ball Bearing Drawer Slides | Roller Bearing Drawer Slides |
| Construction | Consists of two linear rows of ball bearings located in a track. | Includes cylindrical rollers enclosed in a slide. |
| Durability | Highly durable and can handle more weight due to multiple contact points. | Less durable compared to ball bearings, generally used for lighter applications. |
| Smoothness of Operation | Provide very smooth operation, even under heavy loads. | Generally offer smooth operation, but may not be as smooth as ball bearing slides under heavy loads. |
| Noise Level | Usually quieter as the balls help minimize friction and noise. | May be noisier than ball bearing slides due to increased friction. |
| Cost | Generally more expensive due to high manufacturing precision. | Usually less expensive as they are easier to produce and install. |
| Weight Capacity | High-weight capacity, suitable for heavy-duty storage or industrial applications. | Lower weight capacity, suitable for light to medium duty applications such as in residential furniture. |
| Maintenance | Lower maintenance due to the way ball bearings reduce wear. | May require more frequent replacement due to wear and tear. |
In contrast, roller-bearing slides are renowned for their ease of installation and adjustability. They consist of wheels or rollers that move along tracks, creating a smooth movement for the drawer box. If you are building drawer boxes for the first time, you might appreciate the straightforward installation process that roller-bearing slides offer.
Ultimately, the choice between ball-bearing and roller-bearing slides will depend on your specific requirements, the nature of your project, and your level of expertise in building drawer boxes. Both types, when installed correctly, can contribute to the smooth operation and reliability of your drawer box, making them an integral part of any drawer construction project.
Building the Drawer Box: Height and Dimensions
Building a sturdy and well-constructed drawer box is essential for longevity and proper functionality. Follow these steps to construct the drawer box:
Step 1: Determine the ideal height of the drawer box based on the application and personal preference. Measure the height of the cabinet opening and subtract the thickness of the drawer slides and the desired clearance to calculate the height of the drawer box.
Step 2: Cut the front, back, and side pieces of the drawer box from plywood according to the calculated dimensions. Use a table saw or circular saw to achieve precise cuts.
Step 3: Ensure that the front and back pieces are the same length, and that the side pieces fit between them. This ensures a square and correct size of your drawer box.
Step 4: Apply wood glue to the edges of the side pieces and attach them to the front and back pieces. Use clamps to hold the pieces in place until the glue sets.
Step 5: Reinforce the joints by drilling pilot holes and inserting wood screws. Countersink the screws to ensure they are flush with the surface of the plywood.
Step 6: Verify that the drawer box is square by measuring diagonally from corner to corner. Both diagonal measurements should be equal.

Crafting a Robust and Steady Drawer Box: Selecting the Right Joinery Techniques
A pivotal aspect of learning how to build a cabinet drawer revolves around the art of joinery. This concerns how the drawer box pieces are connected to each other, a decision that directly influences the strength and stability of your drawer box. Given the variety of joinery methods available, it’s essential to choose the one that suits your project best.
Among the most commonly employed joinery techniques are dovetails, pocket screws, and simple butt joints. Dovetails, while requiring more skills and precision, are renowned for their incredible strength and are often used in high-quality woodworking. Pocket screws, on the other hand, are easy to install and offer a good balance between strength and ease of assembly, making them a popular choice for DIY drawer box projects.
Additionally, butt joints reinforced with wood glue and screws are a straightforward option that can be a suitable choice for beginners. While not as robust as dovetails or pocket screws, these joints can still provide a stable structure for light to medium-duty drawers.
In the process of assembly, it’s also important to create a groove at the bottom of the drawer box. This can be accomplished using a router table and allows for the insertion of a piece of plywood to act as the drawer bottom. This not only adds to the drawer’s functionality but also further fortifies the structure, resulting in a sturdy, reliable drawer box.
Each joinery method comes with its own set of pros and cons, and the choice often boils down to the specific requirements of your project and your woodworking skills. With the right joinery method, you can create a strong, stable, and functional drawer box that complements your piece of furniture perfectly.
Selecting the Ideal Plywood for Drawer Construction
Choosing the right plywood for your drawer construction is crucial for durability and strength. Consider the following factors when selecting plywood:
- Plywood Grade: Look for plywood labeled as “Cabinet Grade” or “Shop Grade” as they typically have fewer voids and higher-quality face veneers.
- Panel Thickness: The thickness of the plywood depends on the size and weight capacity requirements of the drawer. Thicker plywood provides more strength and stability.
- Plywood Material: Birch plywood is a popular choice for drawer construction due to its strength and attractive appearance. However, there is a wide variety of solid wood species available, each with its unique characteristics.
- Veneer Type: Choose plywood with a veneer that matches the visual aesthetic you desire for your drawers. A high-quality veneer enhances the overall appearance of the finished drawer.
Ensure that your chosen plywood is flat, free of defects, and compatible with your project’s requirements for optimal results.

Creating Dadoes and Pocket Holes: Assembly Techniques
Creating dadoes and pocket holes are two common assembly techniques for constructing drawer boxes. Follow these steps to incorporate these techniques:
Step 1: Dadoes: Dadoes are grooves cut into the drawer pieces to provide a channel for the drawer bottom panel. Use a router with a Dado blade or a table saw with a Dado stack to cut dadoes along the inside face frame of the front, back, and side pieces. The depth and width of the dadoes should match the thickness of the plywood bottom panel.
Step 2: Pocket Holes: Pocket holes provide a strong and concealed method for joining the drawer box pieces. Use a pocket hole jig and drill to create pocket holes on the inside faces of the side pieces. Ensure that the pocket holes are placed equidistant from the top and bottom edges.
Step 3: Apply wood glue to the dados and assemble the drawer box, inserting the bottom panel into the dados. Use clamps to hold the pieces together while securing them with screws through the pocket holes.
By incorporating dadoes and pocket holes into your drawer construction, you can achieve a sturdy and secure assembly that ensures the longevity and durability of your drawers.
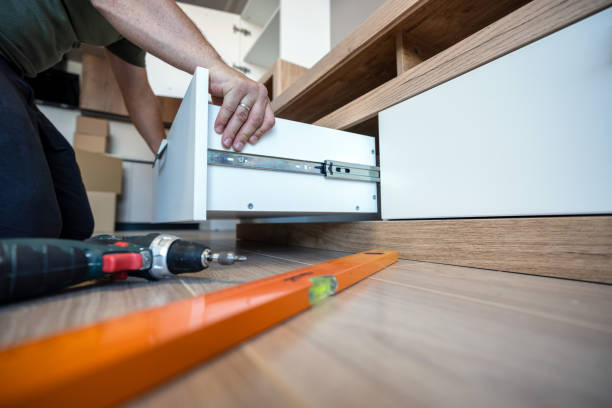
Attaching the Drawer Box to the Slides: Step-by-Step
Now that you have constructed the drawer box, it’s time to attach it to the drawer slides within the cabinet. Follow these steps for proper installation:
Step 1: With the drawer slides fully extended, place the drawer box onto the slides, aligning them with each other.
Step 2: Ensure that the drawer box is level and centered within the cabinet opening. Adjust the placement if necessary.
Step 3: Once properly positioned, use screws to secure the drawer slides to the drawer box sides. Ensure that the screws are long enough to penetrate the drawer box material without protruding through.
Step 4: Test the drawer by sliding it back and forth to ensure smooth and effortless operation. Make any necessary adjustments to the alignment of the drawer slides until the drawer operates smoothly.
Properly attaching the drawer box to the slides ensures a secure and functional drawer that operates smoothly within the cabinet.
Achieving Smooth Drawer Operation: Adjustments and Alignment
Once the drawer box is attached to the slides, it’s important to ensure that the drawer operates smoothly. Follow these steps for adjustments and alignment:
Step 1: Check for any obstructions or binding: Slide the drawer back and forth to identify any areas where the drawer may be catching or rubbing against the cabinet or other components. Remove any obstructions or make adjustments to prevent any binding.
Step 2: Adjust the slides: If the drawer is not sliding smoothly, adjust the position of the drawer slides. Loosen the screws holding the slides to the cabinet and make slight adjustments until the drawer operates effortlessly.
Step 3: Test for even spacing: Ensure that there is even spacing on all sides of the drawer when it is closed. Adjust the slides or make slight modifications to the drawer box placement until you achieve uniform spacing.
Step 4: Lubrication: For improved drawer operation, consider using furniture wax or silicone-based lubricant on the slides. Apply a small amount to the slides and work the drawer back and forth to distribute the lubricant evenly.
By carefully adjusting and aligning the drawer slides and making any necessary modifications, you can achieve smooth and effortless drawer operation.
Adding the Finishing Touch: Attaching Drawer Fronts
Attaching the drawer fronts is the final step in completing your drawer with slides project. Follow these steps for a professional and seamless installation:
Step 1: Determine the desired position of the drawer front on the drawer box. Ensure it is centered and aligned with the surrounding cabinetry.
Step 2: Use clamps or temporary positioning tools to hold the drawer front in place.
Step 3: From inside the drawer box, drill pilot holes through the back of the drawer box and into the drawer front. Take care to maintain the alignment during this step.
Step 4: Secure the drawer front to the drawer box using the appropriate screws. Sink the screws beneath the front drawer face, leaving room for wood filler.
Step 5: Fill any visible screw holes with wood filler and allow it to dry. Sand the filled areas until they are smooth and flush with the front of the cabinet.
Step 6: Finish the drawer front to match the desired aesthetic of your project. You can stain, paint, or apply a clear finish according to your preferences.
By following these steps when attaching the drawer fronts, you can achieve a professional and seamless look for your completed drawers.
Tips for Troubleshooting Common Drawer Building Issues
While building drawers with slides, you may encounter some common issues. Here are some tips to help you troubleshoot and overcome them:
- Misaligned Drawer Slides: If your drawer is not sliding smoothly or is misaligned with the cabinet, check the positioning and level of the drawer slides. Make adjustments by loosening the screws and repositioning the slides until proper alignment is achieved.
- Binding or Sticking Drawers: If your drawers are sticking or binding, inspect them for any obstructions or debris that may be causing the issue. Clean the slides and remove any debris to ensure smooth operation. If necessary, sand or plane any areas where the drawer is rubbing against the cabinet.
- Drawer Box Not Square: If your drawer box is not square, it can affect the smoothness of drawer operation and the alignment of the drawer front. Double-check the squareness of the box during assembly by measuring the diagonal lengths. Make adjustments by clamping the box into a square shape before securing it with screws.
- Loose Drawer Fronts: If your drawer front feels loose or wobbly, check the attachment screws. Tighten them to secure the front to the drawer box. If the issue persists, consider using longer screws or adding additional support with L-brackets or corner brackets.
- Uneven Gaps or Overlapping Drawer Fronts: If your drawer fronts have uneven gaps or are overlapping when closed, double-check the positioning of the drawer box within the cabinet. Make necessary adjustments to achieve even gaps and ensure that the front is properly centered.
Remember, patience and attention to detail are key when troubleshooting drawer-building issues. Take the time to identify and address any problems to ensure a functional and aesthetically pleasing final result.

Conclusion: Your Completed Drawer with Slides Project
Congratulations! You have successfully completed the construction of a drawer with slides. By following this step-by-step tutorial, you have learned the essential techniques and considerations for building sturdy and functional drawers. From understanding drawer slides to calculating font sizes, measuring and mounting slides, creating dadoes and pocket holes, attaching the drawer box to the slides, achieving smooth drawer operation, and attaching drawer fronts, you have gained the skills to tackle future drawer projects with confidence.
Remember to customize your drawer design to fit the requirements of your specific project. The tips provided will assist you in troubleshooting common issues and achieving professional results.
Now, take a step back and admire your completed drawer with slides—a testament to your woodworking skills and dedication. Whether it’s a cabinet, dresser, or any other piece of furniture, your well-built and smoothly functioning drawers will provide practical storage and enhance the overall aesthetics of your project.
Now that you have mastered the art of building drawers with slides, you can apply your knowledge to future projects and explore creative variations to suit your unique style and needs. Happy woodworking!


