Understanding Plywood Edges: A Comprehensive Guide
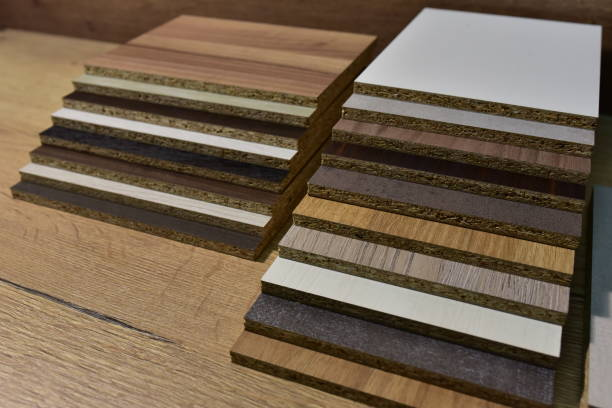
The journey to understand how to finish plywood edges begins with an understanding of what we mean by plywood edges. Plywood, a popular material in woodworking projects, such as bookshelves, possesses unique characteristics. Its edge is typically layered – an aesthetic feature of the plywood known as the plywood edge. These layers, however, may have voids that can disrupt the professional finish sought by woodworkers. An unfinished plywood edge can detract from the overall solidity and appeal of your plywood project, hence the need for properly finishing these edges.
When we speak of ‘finishing’ a plywood edge, we refer to several woodworking techniques used to cover plywood edges, resulting in a clean, professional look. This comprehensive guide will walk you through the finer aspects of how to cover plywood edges and finish plywood so that you can transform your plywood projects, producing work that displays seasoned craftsmanship.

Selecting the Right Type of Plywood for Your Project
Selecting the right type of plywood is vital and can substantially influence how you finish your plywood edges. Many woodworkers often choose plywood based on project needs and the aesthetic appeal of the plywood’s edge.
Consider the most suitable type of plywood for your project; options range from birch plywood, and solid wood, to options like melamine, and hardwood. For instance, a birch veneer type of plywood would permit a stained plywood edge that can be covered with matching birch edge banding for a seamless look. Other types, like solid wood, would require a different approach to achieve the finished edge.
| Type of Plywood | Features | Costs | Applications |
| Softwood Plywood | Made from softwood trees like pine, spruce, and cedar. Strong, flexible, and suitable for structural applications | $ 20-50 per 4×8 foot sheet | Homes and furniture construction |
| Hardwood Plywood | Made from hardwood trees like birch, oak, and maple. Stronger than softwood, it has a smooth finish and is resistant to cracking, staining, and twisting. | $ 30-100 per 4×8 foot sheet | High-end furniture, cabinets, shelving |
| Marine Plywood | High-quality plywood that’s resistant to water, humidity, and moisture. Usually made from Western Larch or Douglas fir | $ 70-150 per 4×8 foot sheet | Boats, decks, bathrooms, kitchens, and other high-humidity environments |
| Baltic Birch Plywood | Known for its strength, durability, and uniformity. It has more plies than other types which makes it very strong and resistant to warping. | $ 50-100 per 5×5 foot sheet | Furniture, drawers, cabinets, crafts |
| MDO Plywood (Medium Density Overlay) | Strong, weather resistant, can handle heavy-duty use. It has a layer of resin-infused fiber that makes it resistant to moisture and wear. | $ 30-60 per 4×8 foot sheet | Signage, exterior walls, concrete formwork |
| OSB (Oriented Strand Board) | Made from heat-cured adhesives and rectangular-shaped wood strands. OSB can be used in the same applications as plywood, but is generally less resistant to water and has a rougher finish. | $ 10-30 per 4×8 foot sheet | Sheathing in walls, flooring, and roof decking |
Your selection also affects the type of edge banding, be it iron-on edge banding with a pre-glued backing or alternative methods. Acknowledging these variations helps in understanding what is a finished edge on wood, as the choice you make can change how you finish plywood edge.
Ultimately, the type of plywood you choose will have significant implications on the tools, techniques, and materials needed to achieve your desired finished edge. Don’t underestimate this initial selection. Take time to research the characteristics and working properties of different plywood types. Consider factors like cost, structural integrity, hardness, ease of finishing, and final appearance. Consulting experienced woodworkers can provide guidance on selecting the right plywood to suit your skill level and project goals. With an informed choice, you will set yourself up for success from the very start. Picking the best plywood for your specific application will enable you to execute the ideal edge-finishing process and get professional-looking results.
Necessary Tools and Materials for Finishing Plywood Edges Effectively
Before diving into how to finish the edge of the plywood, you need to gather the necessary tools and materials. These vary from basic household items such as household iron to specialized woodworking tools like a brad nailer, sander, or orbital sander.
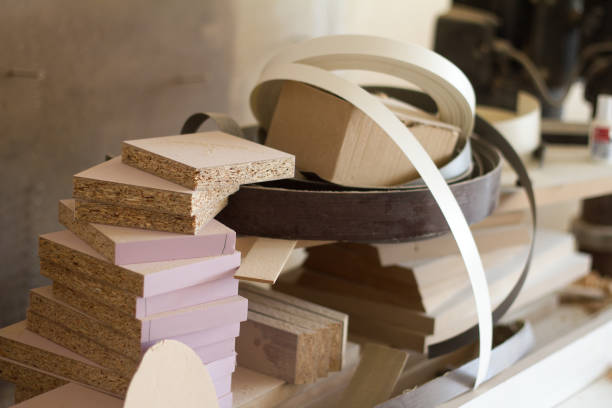
To adequately finish plywood, you would require an assortment from the NLP keyword list which includes glue, preferably wood glue, edge banding, veneer or special tools such as a router for advanced methods like tongue and groove. Moreover, sandpaper, particularly grit sandpaper, and a utility knife are necessary to remove excess from the edges of the plywood.

Additionally, it’s crucial to have a putty knife handy for applications involving wood filler. Supplies such as adhesive (for sticking edge banding), scissors, and potentially a saw, form part of these essential items to effectively finish plywood edges. Includes affiliate links for convenience.
Covering plywood edges requires the application of a specialized finish on the plywood edge and may require other tools and materials like a wood stain or paint. Through these additions, you will have what you need to finish the edge of plywood effectively.
Step-by-Step Guide to Applying Veneer Edge Banding for a Professional Look
Applying veneer edge banding is one of the most popular and easy ways to conceal and finish plywood edges, providing a professional look. The process begins by measuring the length and width of your project’s edge and cutting your edge banding to match. These bandings often come with a pre-glued backing activated by heat application such as with a regular household iron—an easy and inexpensive iron can suffice.
A veneer edge banding typically overhangs a bit on either side of the plywood edge, but any overhang can be trimmed using a utility knife. Smooth with a woodblock and fine-grit sandpaper, and voila – you’ve got a finished edge that is both solid and attractive. Despite the veneer’s simple application, being careful to keep the adhesive activated uniformly along the banding can make a huge difference in the finished look.
Selecting and Using Edge Trimming Tools for Precise and Clean Cuts
Achieving precise and clean cuts is essential when learning how to finish plywood edges. Choosing the right trimming tools is important for this process. Here is a more in-depth look at some of the most common edge-trimming tools:
- Utility Knife: A sharp utility knife offers precision and control while trimming banding material flush with the plywood’s surface. Select a high-quality utility knife with replaceable blades. Always use a fresh, sharp blade for the best results. When trimming, brace your working hand on a solid surface and make small slicing cuts rather than trying to cut through the material in one pass. Take your time and check your progress frequently.
- Chisel: A chisel can be used to carefully trim away thin layers of excess banding for an even and smooth finish. Opt for a high-quality woodworking chisel with a beveled edge. Before trimming, secure your workpiece to prevent slipping. Hold the chisel at a 30-45 degree angle to the work surface and gently tap the end with a mallet to shave off thin pieces of the excess material. Work slowly and reposition the chisel as needed for hard-to-reach spots. The chisel allows for highly controlled trimming.
- Router with Flush Trim Bit: For a professional finish, using a router with a flush trim bit can provide clean edges while saving time compared to manual trimming. Select a quality flush trim bit designed specifically for laminates. Adjust the bit depth so it is perfectly flush with the bearing guide. Rout from right to left to prevent chip out and tear out. Move the router at an even, steady pace without pausing. The router can trim large surface areas quickly but lacks the precision of hand tools.
- Specialty Edge Trimming Tools: There are tools designed specifically for trimming edge banding, like edge trimmers and laminate slitters. These specialty tools allow you to trim laminate edges cleanly and accurately in a single pass. They provide control similar to hand tools but are faster than manual trimming. Use these tools cautiously and with proper training to avoid accidents.
When using any trimming tool, make sure to work carefully and gradually to ensure clean, accurate cuts without damaging the surrounding surfaces. The right tools, used properly, will give you professionally trimmed edges.
Mastering the Art of Round-over Routing for Smooth Plywood Edges
Round-over routing is a technique that adds a decorative and smooth finish to plywood edges. With the help of a router and a round-over bit, you can create a smooth curve along the edges of the plywood, giving it a professional and polished appearance.
To achieve this technique, begin by carefully selecting the appropriate router bit size for the desired round-over profile. Ensure that the router is securely attached to a stable surface and adjust the depth of the bit to the desired level. Carefully guide the router along the edges of the plywood, taking care to maintain a steady and consistent pace. This will result in evenly rounded edges that enhance the overall look of the plywood project.
When using round-over routing, it’s essential to consider safety precautions such as wearing protective goggles and using clamps or jigs to secure the plywood during the routing process. Additionally, practice on scrap pieces of plywood before working on your actual project to refine your technique and achieve the desired results.

Best Techniques for Using Wood Filler to Create Seamless Edges
Wood filler is a valuable tool for creating seamless edges on plywood. It helps fill voids, gaps, or imperfections on the plywood surface, resulting in a smooth and flawless finish. To effectively use wood filler, follow these steps:
- Begin by selecting a suitable wood filler that matches the color and grain of the plywood. This ensures that the filled area seamlessly blends with the surrounding surface.
- Clean the plywood edges thoroughly, removing any dust or debris that could interfere with the adhesion of the wood filler.
- Using a putty knife, apply the wood filler generously to the voids or gaps on the plywood edges. Be sure to press the filler firmly into the gaps to achieve a flush finish.
- Allow the wood filler to dry completely based on the manufacturer’s instructions. Once dry, sand the filled area using fine-grit sandpaper to achieve a smooth and even surface.
- After sanding, wipe away any dust residue and assess the filled area to ensure it matches the surrounding plywood surface. If necessary, repeat the filling and sanding process until the desired result is achieved.
- The wood filler provides a versatile solution for creating seamless edges on plywood and can be further enhanced with staining or painting techniques for a customized finish.
Please note that using wood filler is primarily suitable for projects where the plywood edges are meant to be concealed. If you desire a different aesthetic, employing other techniques such as edge banding may be more appropriate.
Customizing Your Plywood Edges with Stain, Paint, or Contrasting Banding
One of the most effective ways to add a personalized touch to your plywood project is by customizing the edges using stain, paint, or contrasting banding. This allows you to match the edges to the overall design or create a striking visual contrast.
Staining the plywood edges is a popular choice that imparts a natural and warm look. Start by sanding the edges smooth, ensuring they are free of any imperfections. Apply the wood stain using a brush or a cloth, following the manufacturer’s instructions for the best results. Multiple coats may be necessary to achieve the desired level of color intensity.
Alternatively, you can opt to paint the plywood edges. This allows for complete customization, as you can choose any color that complements your project’s aesthetic. Apply a primer first to ensure proper adhesion, then use a brush or a paint sprayer to apply the paint evenly. Multiple coats may be necessary for an opaque and durable finish.
Another option for customization is the use of contrasting edge banding. This involves selecting a banding material that contrasts with the plywood’s color or texture. For example, if you have light-colored plywood, you could choose a darker banding material to create a striking visual effect. The banding can be applied using adhesive and trimmed to fit seamlessly along the edges.
Whether you choose staining, painting, or contrasting banding, customizing your plywood edges adds a unique and personal touch to your project, elevating its overall appearance.
Please note that if you decide to paint or stain the edges, protecting the surrounding areas using painter’s tape can help achieve clean lines and prevent unintentional marks or smudges on the plywood surface.
Adding Decorative Molding for a Stylish Plywood Edge Finish
Adding decorative molding is a great way to give your plywood edges a polished, high-end look. Here are some tips for selecting and installing molding:
- Choosing Molding Style – Consider the style of your project and decor. Profiles like ogee, chamfer, quarter-round and cove can add interest. Simple trim pieces create a clean finish. Wider crown moldings make a dramatic statement. Match existing trim in a room for cohesion.
- Material Options – Molding comes in different materials like wood, PVC and polyurethane. Solid wood offers a premium appearance but requires more upkeep. Wood veneer is affordable and mimics solid wood. PVC and polyurethane are durable, low-maintenance choices.
- Measuring and Cutting – Measure the perimeter of the plywood edges requiring trim and add about 12 inches to allow for corners and errors. For inside corners, miter edges at 45 degrees for a flush fit. For outside corners, cut molding ends square and overlap them. Use a miter saw fitted with a fine-finish blade for smooth cuts.
- Installing Molding – Attach molding with construction adhesive, nails or both for a secure hold. Pre-drill molding to prevent splitting. Use painter’s tape to hold pieces as the adhesive dries. Fill nail holes with putty once mounted.
- Finishing Touches – Apply wood filler over any gaps for a seamless look. Use fine-grit sandpaper to smooth molding before finishing with paint or stain to match your design.
With the right molding and careful installation, you can easily customize your plywood edges to suit your unique style. Decorative trim takes projects to the next level.
How to Repair and Refinish Damaged Plywood Edges?
Over time, plywood edges can become damaged due to wear and tear, accidental bumps, or other factors. Fortunately, there are techniques to repair and refinish these damaged edges, restoring them to their former glory. Here’s a step-by-step guide to help you:
Step 1: Assess the damage
Start by examining the extent of the damage on the plywood edges. If there are minor dents or scratches, these can often be repaired using wood filler. For more significant damage, such as deep gouges or chipped edges, you may need to consider replacing the damaged sections with solid wood trim.
Step 2: Wood filler application
For minor imperfections, use wood filler to fill in the damaged areas. Apply the wood filler with a putty knife, ensuring it is level with the surrounding plywood surface. Allow it to dry according to the manufacturer’s instructions, and then sand it smoothly using fine-grit sandpaper.
Step 3: Solid wood trim replacement
In cases where the damage is extensive, it may be necessary to replace the damaged sections with solid wood trim. Measure and cut the trim to fit the damaged area precisely. Apply a layer of wood glue to the back of the trim and press it onto the damaged edge, holding it in place with clamps until the glue dries. Once the glue is fully cured, sand the trim and blend it with the rest of the plywood surface.
Step 4: Finishing touches
After repairing the damaged edges, it’s important to ensure a seamless and uniform finish. Sand the entire plywood surface, including the repaired areas, using progressively finer grit sandpaper. This will help smooth out any imperfections and create a consistent texture. Clean the surface of any dust and debris before applying the chosen finish.
Step 5: Choose and apply the finish
Depending on your project’s requirements and desired aesthetic, you can choose from various options such as staining, painting, or clear coat finishes. Follow the manufacturer’s instructions for the chosen finish product and apply it evenly, paying special attention to the repaired areas.
By following these steps, you can effectively repair and refinish damaged plywood edges, restoring them to their original condition or even enhancing their appearance.
Pro Tips for Maintaining the Quality and Finish of Your Plywood Edges
To ensure the longevity and professional look of your finished plywood edges, here are some helpful tips for maintenance:
- Regular cleaning: Dust and debris can accumulate on plywood edges, affecting their appearance. Regularly clean the edges with a soft cloth or a brush to keep them free from dirt.
- Protective coatings: Consider applying a protective coating, such as a clear polyurethane finish, to the plywood edges. This helps protect against moisture, scratches, and other forms of damage, ensuring the longevity of your project.
- Avoid excessive moisture exposure: Plywood is susceptible to damage from excessive moisture. Avoid exposing the edges to prolonged moisture or direct water contact. If the edges do get wet, promptly dry them to prevent warping or other issues.
- Handle with care: When moving or handling projects with finished plywood edges, be mindful of potential impact or bumps that can cause chipping or damage. Use caution and protective measures when necessary.
- Periodic refinishing: Over time, the finish on the plywood edges may wear off or become dull. Consider periodically refinishing the edges to maintain their appearance. Lightly sand the edges to remove any imperfections and apply a fresh coat of the chosen finish product.
By following these pro tips, you can ensure that your finished plywood edges retain their quality, enhancing the overall appeal of your woodworking projects.
The Importance of Accurate Cuts and Measurements for the Perfect Plywood Edge Finish
When it comes to finishing plywood edges, accurate cuts and measurements play a crucial role in achieving a perfect edge finish. Here’s why:
- Seamless appearance: Accurate cuts ensure that the edges of the plywood meet precisely, resulting in a seamless and smooth surface. This is especially important when applying edge banding or joining multiple pieces of plywood.
- Proper fitment: Accurate measurements ensure that the edge banding or trim fits tightly and evenly along the plywood edges. This prevents gaps or overhangs, creating a professional and polished look.
- Stability and durability: Precise cuts and measurements contribute to the stability and durability of the finished plywood edges. Properly fitted edge banding or trim helps protect the edges from moisture, impacts, and other potential sources of damage.
- Enhanced aesthetics: The overall visual appeal of the plywood project is greatly enhanced when the edges are cut and measured accurately. It exudes craftsmanship and attention to detail, elevating the overall quality of the finished piece.

Conclusion
In conclusion, finishing plywood edges is a crucial aspect of any woodworking project that aims to create a polished and professional appearance. By understanding the different types of plywood edges, selecting the right materials and techniques, and taking care to maintain the quality and finish of your edges, you can transform your plywood projects and achieve results that showcase your prowess as an adept craftsperson.
From applying veneer edge banding and round-over routing techniques, to using wood filler or customizing the edges with stains and paints, this comprehensive guide has delved into various techniques to help you learn how to finish plywood edges in a manner that elevates your artistry.
The importance of accuracy in cuts and measurements, the significance of maintaining the quality and finish of your plywood edges, and the essential pro tips shared here will contribute to honing your skills as both a beginner and advanced woodworker. With this knowledge and practical implementation, your finished plywood projects will have a professional and aesthetically pleasing appearance that showcases your abilities in woodworking.


