
Understanding the Importance of Cabinet Handles
Every kitchen has a vibe, and cabinets help set it. They’re not just for keeping your cereal boxes and plates. They’re like the quiet fashion icons of your cooking space. And let’s not forget the little champs that really amp up the look: cabinet handles and knobs. Picture walking into a kitchen and seeing cabinets decked out with shiny brass handles—it’s like they’re welcoming you with a warm glow. Every knob’s buffed just right, and those drawer pulls feel like a friendly handshake.
Swapping out cabinet handles might seem small, but hey, does it make a difference? That cool, brass handle can take your cabinets from okay to wow. And a fun knob? That’s like a dash of happiness for your storage.
Ready to start this makeover? Choosing the right handle isn’t just picking something good; it’s about finding a piece of your home’s heart. Before we dive into putting them on, we’ll make sure every hinge and handle doesn’t just fit—they gotta match the dream you have for your place.
Pre-Installation Planning
Before you unveil your cabinet’s fresh look, let’s prep up like we’re getting ready for a big show.
Tools and Materials Needed for the Job
First up, you’ll need a solid toolkit. Grab your trusty screwdriver, some sharp drill bits for cutting through the cabinet material, a solid template for marking where those handles will go, masking tape for sharp lines, and don’t forget a good tape measure. Be careful with the drill bits and screwdriver—you want to keep safe and not scratch up your cabinets.
Selecting the Right Style of Handles for Your Cabinets
Now onto the main event: those cabinet handles. Choosing the right brass pulls or knobs is key. It’s all about your style and the vibe you’re aiming for. A shiny brass pull can make a plain kitchen feel upscale, or a funky knob might be perfect for a vintage look. Your new hardware should fit right in with your cabinet’s wood, color, and style and make it pop without taking over the show.
Deciding on the Positioning of Handles
Next is figuring out where to put those handles or knobs, and that’s all about what you like. Maybe you want pulls on the bottom corner of the door frame for a smooth look or a knob right in the middle for a classic touch. These little things are what you and your guests will see and touch every day, so their spot has to be spot-on—both looks-wise and in practical use.
With your toolkit ready and the ideal hardware picked out, it’s time to take off the old handles. We’ll tackle this with the same focus and care as when we chose our new pieces.
Removing Old Cabinet Handles
Time to switch things up on those cabinets! Ready? Let’s get that screwdriver and get to work on those cabinet doors. First thing, you’re gonna unscrew the old knobs. Find the screws holding them on the back of the door and get them out. Off they go! Now, grab a tape measure and check the space from those holes to the edges of the door. You’ll want to know this so you can fit the new hardware just right; usually, a few inches from the edge is your sweet spot.
Stuck on a screw or knob that won’t come off? No problem. Try a different screwdriver; maybe swap a Phillips for a flathead to get a better grip. If it’s your first time and a screw’s being a real pain, don’t sweat it. You can use a piece of cardboard for a better grip or a special drill bit for stubborn screws. Keep it gentle; you don’t want to mess up your cabinet door.
Now that the old stuff’s out, it’s game time for the new hardware. This part’s all about getting it just right. Measure twice, so when you put those new cabinet knobs on, they’re perfect.
Measuring for New Handle Placement
Creating a Template to Ensure Level and Aligned Handles
No one appreciates a crooked handle; it’s like a crooked smile, unsettling. Creating a template with cardboard is an easy way to ensure your new handles sit in the perfect vertical position. Measure the distance between the screw holes on your new handles, then transfer these measurements to your template. Double-check—no, triple-check—before you mark the cabinet door.
Tips for Aligning Handles on Different Cabinet Styles
Different strokes for different folks, or in our case, different cabinet styles. A door frame may call for a different approach than drawer fronts. Some may favor edge alignment, while others may prefer a more central placement. It’s not just about the first impression, but also about the ease of use and the line of sight.
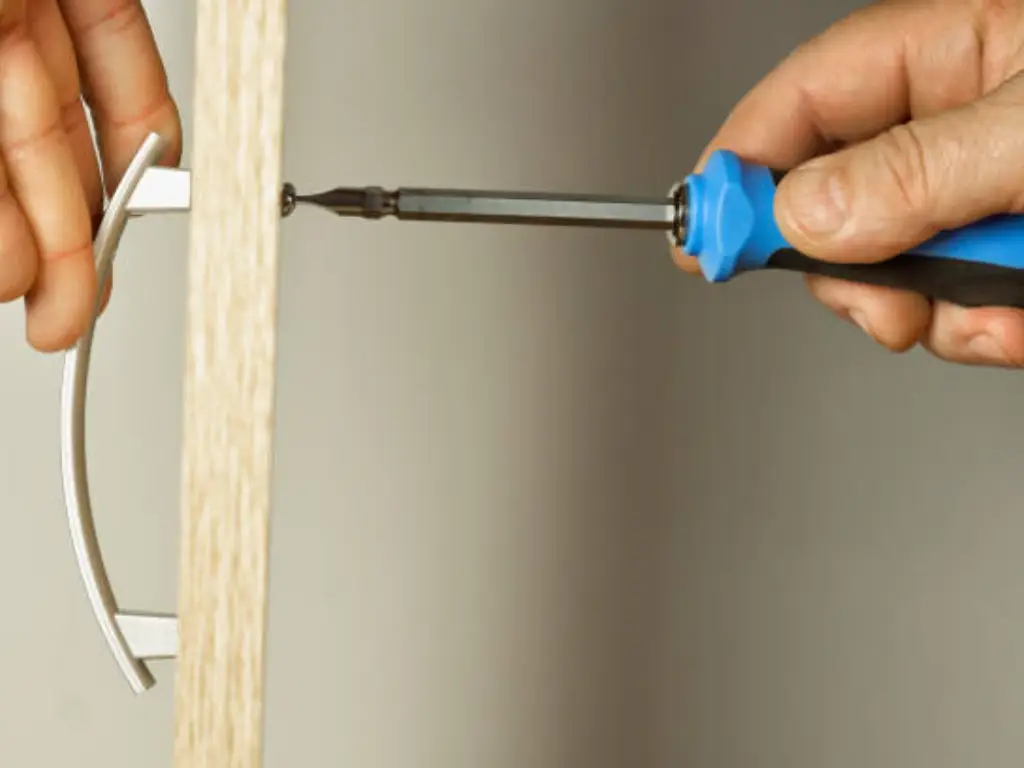
Drilling Holes for New Handles
Marking the Drill Points
Alright, let’s tackle putting in those cool new cabinet handles. First, grab your template and dot where you’re gonna drill for those fresh holes with a marker. If you’re a bit jittery, give it a whirl on an extra wood piece first. That way, you can make sure your drill won’t wander off when you hit the real deal on the door’s backside.

Techniques for Drilling Clean, Precise Holes
Time to drill! Line up the drill with your marks. Keep your hand steady—no need for Hulk strength here. Loop some masking tape around the drill to stop you from drilling too deep. Pop the cabinet door open and support it well to dodge any damage. Take it slow—this isn’t just about making holes; it’s about getting your cabinet ready for those snazzy brass pulls and making sure the hardware looks top-notch.
Installing the New Handles
Alright, let’s jazz up those cabinets with some snazzy new hardware. Line up the new hardware’s screw holes with the ones on your cabinet door. Grab the knob or handle with one hand, and with the other hand, grab your screwdriver to get those screws nice and snug. Pop the screws in from the back of the door and twist them in easy-peasy fashion. Don’t go Hulk on them, though; you don’t want to crack that door.
Adjusting Handles for a Perfect Fit
Once those fresh cabinet pulls are sitting pretty, you might have to nudge them a bit to get them perfectly straight on your drawers. A little push can go a long way toward making them look sharp. If that handle’s jiggling or feels kinda loose, give your screwdriver a quick spin to tighten it up. Remember, it’s like Goldilocks’ porridge—not too tight or you’ll split the wood around those screw holes, but not too loose either, or you’ll be picking up handles off the floor. You know, like when a handle looks all good to go but then goes all wonky when you pull it? A little tweak should set it straight.
So, here’s the lowdown on switching out your hardware from start to finish:
| Step | Action | Tools Needed |
| Removing Old Hardware | Unscrew and measure screw holes distance | Screwdriver, Tape Measure |
| Measuring for New Hardware | Mark new screw holes using a template | Template, Marker, Tape Measure |
| Drilling Holes | Drill where marked, with depth control | Drill, Drill Bit, Masking Tape |
| Installing New Hardware | Align, place, and screw in the new hardware | Screwdriver, New Hardware |
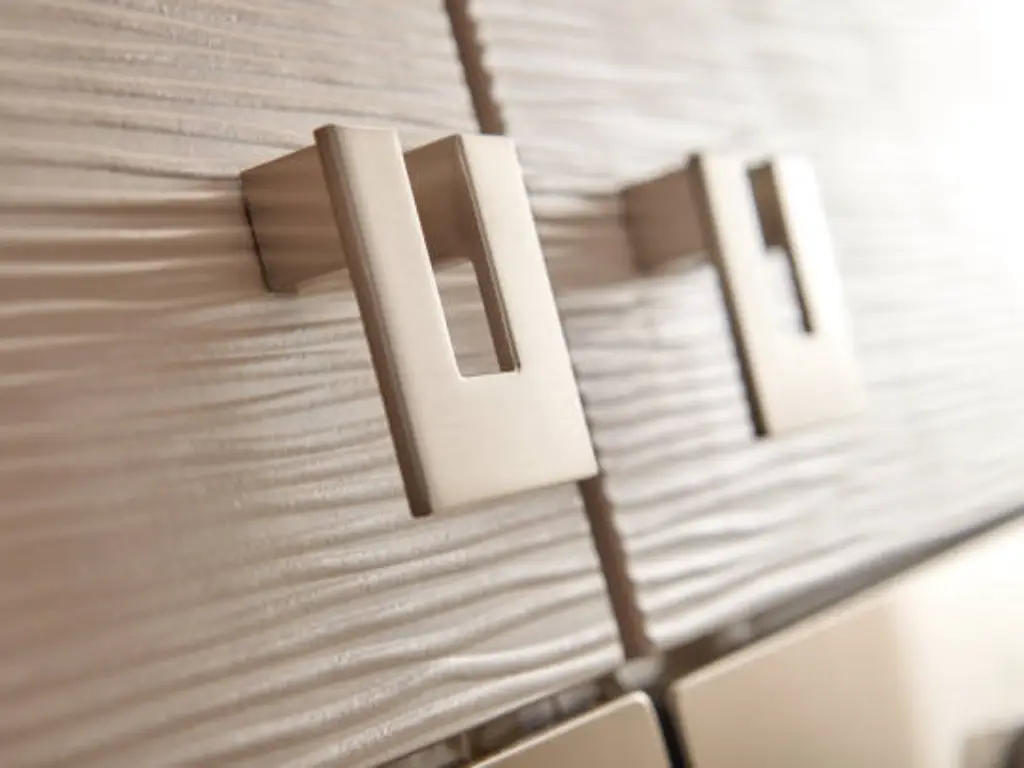
Finishing Touches for Handle Installation
Checking for Alignment and Final Tightening
Now, stand back and admire your work. Are the handles aligned? Do they follow the vertical position and personal preference you envisioned? Make any necessary adjustments, then give those screws a final tightening—not with brute force, but with the finishing touches of an artist completing a masterpiece.
Cleaning and Maintenance Tips
Your new cabinet handles deserve the best care. Wipe them down with a soft cloth, and avoid harsh chemicals that could tarnish the brass or degrade the material. Regular maintenance ensures that your handles remain not just a functional piece of your kitchen but also a testament to your personal style and attention to detail.
Troubleshooting Common Installation Issues
Dealing with Misaligned Handles
Even the most experienced craftsperson can encounter a hiccup—a handle slightly askew. If this happens, don’t despair. Loosen the screws slightly, adjust the handle to the desired position, and retighten. It’s a simple fix that requires a steady hand and an eye for detail.
What to Do If You Drill a Hole Incorrectly?
In the rare event that a hole is drilled incorrectly, all is not lost. You can fill the hole with a wood filler, sand it down once it’s dry, and then re-paint or stain the area to match the cabinet. It’s a setback, sure, but also a chance to learn and grow in your DIY journey.
Wrapping It Up: Giving Your Cabinets a Fresh Spin
Alright, you’ve tackled those install hiccups, right? Now’s the time to step back and admire the change. Switching up your cabinet handles is more than just a fix-it task; it’s about infusing new energy into your space. Hunting down the coolest door pulls or the slickest knobs is a fun way to dial up your furniture’s fashion. It’s the easiest trick to throw in a dash of your personality and shape a unique atmosphere that’s totally you. And it’s not just about your drawers and cabinets being a breeze to open; they’re now starring in your room’s fresh look and vibe.
Remember, grabbing the right cabinet handles is a fantastic move to update your decor. On the lookout for something that stands out? Hit up some hardware spots for pieces that scream ‘you’. With a little help from the pros, you can nail down cabinet hardware that’s a flawless fit for your home’s style and your personal flair.
If you have other questions about cabinet hardware, feel free to contact Maxave for professional help!


