Understanding the Importance of Cabinet Hardware Installation
Many might dismiss cabinet hardware as a minor detail, but the right piece of hardware can bring a significant impact on the overall look of your home. Installing cabinet hardware, such as cabinet handles or knobs, not only revamps your cabinetry but also enhances the functionality and aesthetic appeal of your kitchen, bathroom, or any other area of your home that has cabinets. It’s an easy way to revamp old cabinets, making them feel new again. The important thing to note here is that knowing how to install cabinet hardware properly is crucial to achieving the desired effect. An incorrectly placed knob or pull handle can disrupt the overall symmetry and balance of your cabinet design. Moreover, in the long run, improper cabinet handle installation can lead to difficulties in accessing the cabinets and can cause undue wear and tear.
What Tools and Materials Will You Need for the Project?
Before diving into the DIY project, it’s crucial to gather all the necessary tools and materials. The essential ones for cabinet handle installation include new cabinet hardware (knobs, pulls, or handles), a screwdriver, a cabinet hardware jig for consistent placement, a drill with the correct size drill bit for the cabinet hardware, masking tape to prevent surface damage while drilling, and an awl to mark drill points. Additional items like a piece of cardboard can be handy to collect drilling residue, and wood filler is useful if you have to cover up old drill holes. Also, a store-bought template can assist in marking the right spots for drilling if you don’t have a jig. Remember, the best way to avoid running to the hardware store in the middle of your project is to plan and prepare beforehand. For purchasing cabinet hardware and other necessary tools, consider using trusted online platforms like Amazon. Full disclosure, there may be affiliate links for products on these platforms.
| Tools/Materials | Usage | Importance (1-5) |
| Cabinet Hardware (knobs, pulls, handles) | These are the items that you will be installing on the cabinet. | 5 |
| Screwdriver | Used to tighten the screws of the cabinet hardware. | 5 |
| Cabinet Hardware Jig | A jig helps in ensuring consistent and correct placement of the cabinet hardware. | 4 |
| Drill | The drill is used to create holes in the cabinet where the hardware will be installed. | 5 |
| Correct Size Drill Bit | The drill bit is used in conjunction with the drill. The size of the bit needs to match the size of the hardware screws. | 5 |
| Masking Tape | Masking tape is useful to prevent surface damage while drilling. It’s placed on the cabinet where the hole will be drilled. | 3 |
| Awl | The awl is used to mark drill points accurately on the cabinet. | 4 |
| Piece of Cardboard | It collects drilling residue and keeps the work area clean. | 2 |
| Wood Filler | Wood filler is useful if you need to cover up old drill holes from previous cabinet hardware. | 3 |
| Store-bought Template | Likewise the jig, a template can assist in marking the right spots for drilling if you don’t have a jig. | 4 |
Step 1: Preparing Your Cabinets for Installation
Preparation is the first step toward successful cabinet hardware installation. Start by cleaning the cabinet door and drawer fronts. A clean surface ensures better adhesion and alignment of the new cabinets’ hardware. If you’re working with old cabinets, consider using a wood filler to cover up any existing holes that won’t be used. Once filled, you can sand and repaint or stain the surface for a smooth finish. For new cabinets, you might want to consider finishing the cabinets before installing the hardware. This is because the finishing process can cause cabinets to swell or warp, affecting the alignment of your hardware installation.
Step 2: Choosing the Right Cabinet Hardware for Your Style
Selecting the right cabinet hardware hinges on personal preference and the overall design of your home. The market offers a plethora of styles, from vintage brass knobs to sleek and modern pull handles. While choosing, keep in mind the functionality and ease of use alongside the aesthetic appeal. For instance, knobs are traditionally used for doors, while drawer pulls are typically used for drawers for a better grip. The size of the hardware is another important thing to consider. The rule of thumb is that larger drawers require longer pull handles.

Step 3: Measuring and Marking the Perfect Placement
The hardest part of installing cabinet hardware is arguably marking the correct spot to drill holes. Even minor inaccuracies can result in a skewed handle or knob, detracting from your cabinetry’s overall look. First, you must decide where you want to place your hardware. The placement typically depends on the type and design of the cabinet and the kind of hardware.
Typically, knobs for cabinet doors are placed about 2.5 to 3 inches from the bottom or top corner, opposite the hinge. Pull handles on drawers are usually centered, both top-bottom and side-to-side. Using a ruler or a measuring tape, measure the desired placement and mark it with a pencil or an awl. If you’re installing handles on cabinets with two or more screw holes, make sure to measure the distance between the holes too.
Step 4: Using Templates for Precise Drilling
A cabinet hardware jig or a store-bought template can be a lifesaver for DIY enthusiasts installing handles on cabinets. This tool helps you measure and mark the drilling points accurately across all doors and drawers, ensuring uniformity. This is especially useful when you have multiple cabinets to handle. To use a jig, align it with the corner of the door or drawer, adjust the guides to your marked points, and then drill through the guide holes.
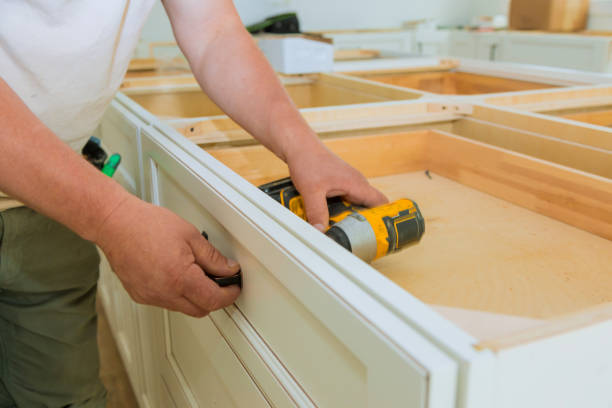
Step 5: Drilling Holes in Your Cabinets without Damaging the Surface
Now comes the moment of truth – drilling the holes. Before you begin, ensure you have the correct size drill bit. The diameter of the drill bit should match the diameter of your hardware screws. It’s advisable to practice drilling on a piece of scrap wood or a piece of cardboard before proceeding with your cabinets. Once confident, place masking tape over your marked points to protect the surface finish. Then, hold your drill perpendicular to the surface and start drilling. Apply steady pressure, but do not force it through, as that could cause damage.

Step 6: Securing Cabinet Knobs and Pulls in Place
After drilling the new holes, it’s time to secure your knobs or pull handles in place. Place the screw in the hole from the inner side of the drawer or door, ensuring it comes out through the front of the cabinet door. Align the screw with the hole in your hardware and tighten it using a screwdriver. Do not over-tighten as it can damage the hardware or the cabinet door. Repeat this process for all doors and drawers.
Troubleshooting Common Issues During Installation
The installation process of cabinet handles can sometimes be riddled with problems that seem to crop up unexpectedly. The frustration these issues cause can dampen the excitement that comes with adding a new aesthetic touch to your cabinets. Let’s dissect a few of these common problems and provide practical solutions to resolve them.
The first and most common problem is an inaccurate measurement of the distance between the drilling holes. A mismeasurement can result in handles being placed askew or not fitting in at all. Before drilling any holes, it is critical to carefully measure and mark the precise spots where the screws will be inserted. Use a tape measure or a cabinet hardware jig to ensure your marks are accurate and level. The saying “measure twice, cut once” applies here.
The next common issue pertains to the hardware not fitting correctly. This often happens when the drill bit used is either too large or too small for the handle’s screws, leading to holes that do not align with the handle’s fittings. When selecting a drill bit, always ensure it is the same size as your hardware screws. If the hole ends up being too large, you can fill it with wood filler, let it dry, then re-drill with the correct size. If the hole is too small, simply use a larger drill bit.
The drill bit slipping on the cabinet surface is another problem that can create uneven holes or damage the cabinet’s finish. To avoid this, you can put a piece of masking tape over the area where you’ll be drilling. The tape will provide traction and prevent the drill bit from slipping, protecting your cabinet’s finish. Similarly, ensuring your drill is fully charged before starting your task will ensure consistent drilling power, preventing unexpected stops or variable drilling speeds that might affect the quality of the holes.
Finally, another frequent issue is handles or knobs not fitting snugly on the cabinet doors. This might be due to irregular hole sizes, stripped screws, or even the cabinet’s material. In this case, you might need to re-drill the holes or switch to larger screws. If the problem is due to stripped screws, consider using a longer screw or adding a washer to provide extra grip.
Tips for Enhancing the Cabinet Hardware’s Durability
Once you’ve installed your cabinet hardware successfully, ensuring its longevity becomes a priority. A beautiful cabinet handle will lose its appeal if it becomes tarnished or loose over time. Fortunately, there are several steps you can take to enhance the durability of your cabinet hardware.
First, always use the right cleaning materials. Avoid harsh chemicals or abrasive cleaners that can damage the surface of your handles and knobs. Such substances can strip away the finish, leading to tarnishing or corrosion. Instead, use a soft cloth dipped in warm soapy water to gently clean your cabinet hardware. Rinse thoroughly and dry with a soft, dry cloth to avoid water spots or streaks.
If your cabinet hardware is made of brass or copper, consider using a metal-specific polish. These polishes are designed to clean, polish, and protect the metal, helping to maintain its luster over time. However, be sure to follow the manufacturer’s instructions to avoid damaging your hardware.
The method of installation also plays a crucial role in the durability of your cabinet hardware. Ensure that all screws are properly tightened during installation, but be careful not to over-tighten as this can strip the screw holes or crack the hardware. If your hardware becomes loose over time, gently tighten the screws; if the screws are continually loosening, consider using thread-locking fluid on the screws.
Lastly, regular inspection of your cabinet hardware can help enhance its durability. Check for any signs of damage, such as loosening screws or tarnishing, and rectify them promptly. Small issues that are left unattended can quickly lead to bigger problems that could ultimately shorten the lifespan of your cabinet hardware.

Finishing Touches: Cleaning and Maintaining Your Newly Installed Hardware
After the completion of your cabinet hardware installation process, attention must be turned towards adding the final touches to ensure the aesthetic appeal is matched with optimal function. This involves getting rid of any leftover debris, residue, or fingerprints that may have been left on the hardware during the installation. A gentle, non-abrasive cleaner can be used to wipe away these marks, bringing out the shine of your newly installed hardware. In the case of brass handles or knobs, a brass cleaner would be more appropriate to maintain its luster and prevent any potential damage to the finish.
However, cleaning is not merely a one-time task post-installation. Regular cleaning is essential to prevent the build-up of dust and grime that could tarnish the appearance of your hardware over time. Always remember to dry your hardware thoroughly after cleaning. Leaving it wet could lead to the formation of water spots or even cause damage, especially for metal hardware. Using a soft, dry cloth to wipe them down ensures they remain in their best condition.
Post-installation, one must not overlook the importance of routinely checking your hardware for any signs of loosening. The continuous motion of opening and closing cabinets, over time, can cause the screws to become loose. If any such looseness is noticed, immediately use a screwdriver to gently tighten the hardware, but avoid overtightening as it could strip the screw threads or crack the hardware. Regular maintenance like this not only helps in extending the lifespan of your hardware but also keeps your cabinets looking fresh and well cared for.
Proper maintenance also includes immediate action upon observing signs of wear and tear or damage. Early intervention can prevent further damage and increase the longevity of your hardware. By diligently caring for your cabinet hardware, you will be rewarded with a functional and beautiful addition to your home that stands the test of time.
Exploring Creative Hardware Placement Techniques
The placement of cabinet hardware has traditionally followed certain conventions – knobs are typically installed at the corner of cabinet doors and pulls are placed at the center of the drawers. However, these conventions don’t limit the scope of creativity and personalization that one can bring to their cabinet hardware installation.
A popular and unique placement technique is installing the hardware at the center of the cabinet doors. This offbeat style adds a visually striking element to your cabinetry, especially when the hardware design is distinctive. It brings a sense of symmetry and modernity to your bathroom or kitchen cabinets.
Another creative placement technique is positioning the pulls vertically on the drawer fronts. This arrangement can make a bold design statement, especially when paired with larger, more decorative pulls. The vertical orientation adds a fresh, modern look to the cabinetry and can make it feel more contemporary.
One could also consider aligning the cabinet hardware in non-traditional ways, like placing them diagonally or using two knobs on wider drawers for a unique, symmetric look. These variations can inject personality and a sense of uniqueness into your kitchen or bathroom.
However, it’s crucial to keep functionality at the forefront of your decision-making process while exploring these creative placements. Consider how the cabinets will be used, the height of the users, and the comfort of accessing the cabinets. The hardware should be placed in such a way that it’s easy for all users to reach, and the motion of opening and closing the cabinets is smooth. Always remember, the best hardware placement marries functionality with design aesthetics to create a comfortable, appealing, and practical space.
Taking Your Cabinets to the Next Level: Customizing and Upgrading Existing Hardware
Once you’ve mastered the skill of installing cabinet hardware, you might start looking for ways to further enhance your cabinets. This could mean customizing or upgrading your existing hardware to better suit your aesthetic preferences or to align more closely with the overall style of your home. The beauty of cabinet hardware lies in its adaptability and versatility, providing you with an array of options to bring your vision to life.
One simple yet effective way to upgrade your cabinets is to replace your old knobs or handles with new ones. This seemingly small change can significantly transform the look and feel of your cabinets. Experimenting with different types of hardware like cup pulls, bin pulls, or even euro-style hardware can bring a distinctive touch to your kitchen or bathroom.

Another way to customize your cabinets without completely changing your hardware is to consider refinishing your existing handles and knobs. This can be a cost-effective and eco-friendly way of giving your cabinets a fresh look. From painting your hardware a new color to adding a patina for a vintage feel, refinishing is a flexible option that can create a variety of looks without needing replacement.
Remember, while personalizing your cabinets, you should still maintain a balance between aesthetics and functionality. The hardware you choose should not only look good but also feel comfortable and natural to use.
Exploring Different Styles and Finishes for Cabinet Hardware
With a multitude of styles and finishes available on the market, choosing cabinet hardware can be an exciting yet daunting task. Whether you’re drawn toward the classic appeal of brass knobs or the sleek minimalism of stainless steel pull handles, there’s something to cater to every taste and decor style.
Traditional hardware styles, like round knobs and drop-handle pulls, can imbue your cabinets with timeless elegance. These styles are versatile and can complement a variety of interior designs, from rustic to contemporary.
If you’re aiming for a more modern aesthetic, consider bar pulls or cup pulls. Bar pulls, with their linear design and clean lines, bring a touch of modern sophistication. Cup pulls, on the other hand, while nodding to a vintage aesthetic, have been embraced by modern design for their distinctive and sleek look.
When exploring different styles, also pay attention to the finish. From shiny polished chrome to warm antiqued brass, the finish of your hardware can dramatically affect the overall look of your cabinets. Try to match the style and finish of your hardware with existing fixtures and appliances for a cohesive look.
In the end, your choice of cabinet hardware should reflect your personal style and the overall theme of your kitchen or bathroom. It’s these small details that can truly elevate a space and make it uniquely yours.
Upgrading Cabinet Hardware: Replacing Old with New
One of the most effective ways to rejuvenate aging or outdated cabinets is by upgrading the old hardware with new ones. This relatively simple change can significantly transform the aesthetic appeal of your space, serving as a delightful surprise due to the substantial impact it can create. While the cabinets themselves function as a significant foundational element in your kitchen or bathroom, it’s often the smaller touches – like the cabinet hardware – which complete the overall look.

Choosing to replace older hardware with modern handles can instill a sleek, contemporary vibe in your interiors. These could be long, stainless steel bar pulls that provide a minimalist, industrial feel or even geometric knobs that project an artistic, modern ambiance. Equally, traditional knobs can bring a sense of elegance and classic charm to your cabinets, promoting a warm, cozy environment. Opting for vintage-inspired cup pulls could channel a rustic or cottage-like aesthetic. The choices are myriad and allow a great deal of freedom to express your style.
When replacing your old cabinet hardware with new ones, it’s also crucial to take into account the finish of your new hardware, which should complement the color and finish of your cabinets. From polished chrome to brushed nickel or oil-rubbed bronze, the harmony between the cabinet and hardware finish can add to the overall design cohesion of your space.
Expert Tips for Achieving a Professional Look in Your Cabinet Hardware Installation
Attaining a polished, professional finish in your cabinet hardware installation can greatly amplify the appeal of your space. A few expert tips can guide you in ensuring a smooth and successful installation process.
The first step to installing your cabinet hardware professionally is to use the right tools. A cordless drill, tape measure, a pencil for markings, and a good quality screwdriver are must-haves. The right tools not only make the job easier but offer precision that couldn’t be achieved otherwise.
Uniformity and consistency are key factors in a professional-looking installation. Using a template or a jig for locating your drilling points can successfully accomplish this. A template ensures all your hardware is uniformly positioned across your cabinets and drawers.
Drilling your holes with care is equally vital, as a hastily done job could cause splintering or damage to the cabinet’s surface. Start with a smaller pilot hole before progressing to the full size required for your hardware.
Lastly, never rush the installation process. Taking your time reduces the likelihood of mistakes or inaccuracies. A slower, more cautious approach allows for careful measurements, precise drilling, and thoughtful placement—all essential components of a professional-looking cabinet hardware installation.
Beyond the Kitchen: Installing Cabinet Hardware in Other Areas of Your Home
Cabinet hardware installation is not confined to the kitchen. These useful skills can be employed to enhance various areas around your home that include cabinets. Whether it’s your bathroom, a home office, a bedroom, or even your living area, the addition or alteration of cabinet hardware can rejuvenate the ambiance of the entire space.
In the bathroom, upgrading the hardware on your cabinets or vanity can seamlessly uplift your bathroom’s aesthetic. If you have cabinetry in your home office, changing the old handles or knobs for new ones can refresh the environment, adding some vigor to your workspace. Similar principles apply if you have standalone wardrobes or built-in drawers in your bedroom — new hardware offers an easy and cost-effective way to spruce up the furniture.
Each area presents an opportunity to play with styles, allowing you to create a unique atmosphere in each space. From minimalistic, modern designs in your home office to vintage, rustic hardware in your bathroom, your choices hold the potential to transform any room. As with all hardware installations, remember to ensure ease of use and functionality alongside aesthetic compatibility with the rest of your decor.

Conclusion: Mastering Cabinet Hardware Installation for a Professional Look
In summary, acquiring the skill to install cabinet hardware enables you to enhance your interiors without the significant expense of a full renovation. Equipped with the correct tools, patience, and a keen eye for detail mentioned in this tutorial, you can spruce up any room with cabinets, such as your kitchen or bathroom. While the initial process may seem intricate, the satisfaction from the end results is immense, leaving your rooms with a professional finish. This DIY journey thus offers an opportunity to express your personal style and potentially augment the value of your home through these upgraded aesthetics. So, here’s to a rewarding DIY experience and an immaculately finished space that you can take pride in!


