Introduction
It may seem that door hinge installation is a small problem in home repair, but it is one of the most crucial factors that define how long the door will serve and how easy it is to open and close it. Having the knowledge of how to put hinges on a door can be the difference between a door that opens effortlessly and one that sticks or creaks. Whether you are installing a new door or replacing the hinges on one that is already in place, it is important to know the right procedures. This guide will help you to install door hinges so that your doors are not only beautiful but also functional.
The process of installing door hinges involves certain specific procedures that require some basic tools as well as a level of caution. Even those who have never attempted any do-it-yourself projects before can use this guide to install hinges properly and, therefore, improve the functionality of their doors. This article provides tips, including instructions on how to install door hinges, making such seemingly impossible-looking tasks seem less daunting and much more manageable.
Understanding Door Hinges: An Overview
Types of Door Hinges
Choosing the right type of hinge is crucial because it assists in determining a well functioning door that will last for a long time. Here is a breakdown of some common types of hinges used on doors, which highlights their specific applications and installation requirements:
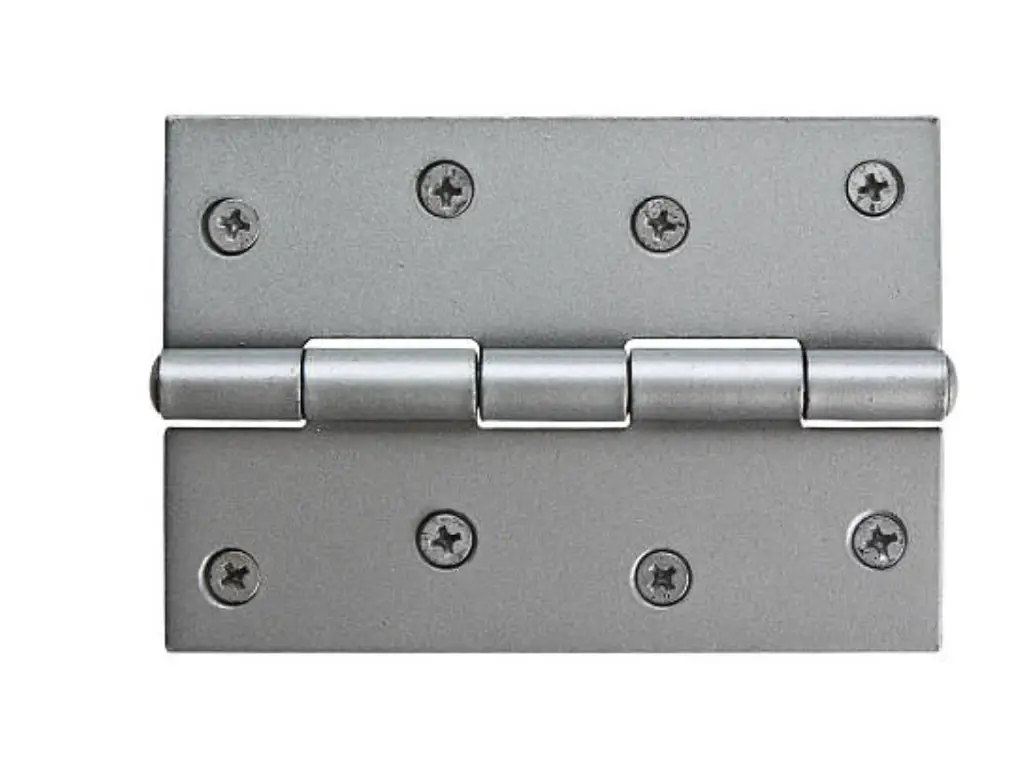
- Butt Hinges: Most often used in doors of homes; these are made of two plates (leaves) hinged by a pin. In order to fit butt hinges, one is often required to cut out mortises in order to accommodate the hinge.
- Pivot Hinges: These are applied on large and massive doors that revolve around a single pivot point. Pivot hinges are installed on the top and bottom of the door and are not visible when the door is shut. Proper orientation during installation is required to ensure that the door glides over its hinge in the right manner.
- Spring Hinges: such kinds of hinges have an added spring which helps in closing the doors on its own. They are most appropriate for high traffic areas such as kitchens and public washrooms. The tension of the spring should be set right when the door is installed to guarantee correct closure without noise.
- Ball Bearing Hinges: Recommended for use on heavy doors because they minimize friction thus enabling doors to open and close smoothly. They have bearings between knuckles but are not present in other types of hinges such as butt hinges. Lubrication during installation should be done properly in order to have a long lasting equipment and in the right working condition.
- Concealed Hinges: Otherwise known as Euro or cup hinges, these are mostly found on cabinet doors and furniture. Whenever closed, they become hidden since their attachment is done inside the frame and door itself respectively. For such items to be installed, there has to be proper drilling to ensure that hinge cups engage the frame and door surfaces appropriately.
Importance of Proper Installation
It is important to properly install door hinges, as it affects the functioning as well as the security features of the door. If hinges are installed properly, then the doors will perform their functions as desired and intended. When hinges are installed incorrectly, for example, it can lead to doors fitting improperly which can lead to a range of problems, such as movement of the hinges and difficulty in trying to secure the door. Proper detailing in orientation is important for the following reasons:
- security: Since the hinges are mounted on the door frame correctly, the possibility of the doors sagging or becoming misshapen that would make the door easy to tamper with is avoided.
- durability: By positioning and providing the correct angle, stress can be relieved off hinges and the door leading to tend to the damage and securing to extend their lifetimes.
- functionality: A correctly framed door easily closes without a lot of friction and noisewhen moved. It allows for ease of operation, without compromising its strength.
- Aesthetic: Provided that the doors are hung with the right hinges and are fitted in the right way, they are able to compliment the rest of the room and thus make it much more aesthetically pleasing.
The installation of all doors hinges must be done accurately as incorrect use of tools will create wrong installations. This will entail accurate measuring, the right placement of hinge placement markings and tightening of the fittings of each of the hinges installed. Further, routine check ups and servicing would also be very helpful in ensuring that the working of the entryway remains to be at the ideal state at all times. Hence by understanding how crucial all steps are during an installation, there is the possibility of getting a secured, functional, as well as aesthetically pleasing doors.
Preparing for Installation

To install door hinges properly, step number one is to prepare all necessary tools and materials. You will have to use some measuring tape, a pencil, drill, screwdriver, chisel, hammer. It is highly sensible to keep wood filler or putty handy in case it is needed for making adjustments while installing or replacing hinges. It follows that if you want to figure out where each hinge should be put, you will need to obtain precise measurements of the door and its frame. In terms of the actual opening and closing of the door, it is critical to place the hinges correctly on the surface of the door and at the perfect height so that the door hangs and swings correctly.
Remove door if it is fitted previously to make sure no elements would affect the future installation; unscrew with a screwdriver or drill the old hinges if there are any. You may also want to take this opportunity to double check your original measurements if you are shifting the marks for new hinges. If building the base properly before any form of installation is considered to be significant, it guarantees that the final product is suitably functional and aesthetically pleasing.
| Tool | Function |
| Measuring Tape | Used to measure the door and frame accurately to ensure correct placement of hinges. |
| Pencil | For marking the precise location on the door and frame where each hinge will be installed. |
| Drill | Required to create pilot holes for screws, making it easier to install the hinges without splitting the wood. |
| Screwdriver | Used to drive screws into the hinges and secure them in place. Also useful for removing old hinges if replacing. |
| Chisel | Essential for carving out the mortise where each hinge will sit, ensuring a flush fit. |
| Hammer | Used in conjunction with the chisel to remove wood for the hinge mortises and for minor adjustments. |
| Wood Filler or Putty | Handy for filling any gaps or correcting mistakes in the wood after hinge installation. |
Step-by-Step Guide to Installing Door Hinges
Key Takeaways
- Accurate Measurements: Hinge positions must be carefully marked and measured both on the door and on the door frame for proper usage and orientation.
- Mortise Depth and Size: The mortises should be chiselled as per their depth and size to the hinges so that they are well recessed within the door surface.
- Drilling Pilot Holes: Prior to putting the screws, marked points should be drilled to prevent wood splitting during screw placement.
- Secure Alignment: Screws used in fixing the hinges should be properly aligned with the door and the frame to prevent any dislocation which may hinder opening or closing of the door.
- Testing Functionality: Once installation is done, check the door by to and fro motion several times while making adjustments to the door if needed for effective closing.
- Consider Weight Distribution: Use hines based on the weight of the door since heavy doors may require a third hinge to avoid anchor displacement.
- Lubrication for Smooth Operation: Hold screws in position at the hinge to prevent undue squeaking of the hinges by application of oil.
- Regular Maintenance: Align hinges every now and again to check if they have become worn out, broken or loose.
Step 1: Marking the Hinge Placement
Door hinge placement is the first step in the process of installing door hinges. The installation starts by marking where each hinge will be located on both the frame and door accurately. In general, the top hinge is usually placed around ten inches from the top of the door, while the second hinge at the bottom is put ten inches above the bottom. A next step may involve adding a third hinge in between for extra support if a door happens to be too heavy. These points are marked by using a pencil and measuring tape to ensure perfect alignment in both the frame and the door. Proper alignment is necessary for maintaining the balance of the door and its smooth functioning.
Step 2: Carving Out the Mortise
Once you have noted where you need to put your hinges, next thing will be carving out mortises. Each groove where every hinge sits is essentially a mortise. Chisel out wood within your pencil marks with use of a sharp chisel and hammer. Precisely, each mortise’s depth as well as size has to match exactly those of a particular hinge so that it sits flush with wood surface. For this reason, this step plays an important part in how good looking that door will appear along with its usability.
Step 3: Positioning the Hinge
Now comes the part when each of these hinges would be positioned in their respective mortises ensuring a tight fit. The direction where the door opens should match with one side of the hinge pin. Accuracy is absolutely paramount here; a slightly misplaced hinge might hamper swinging ability.
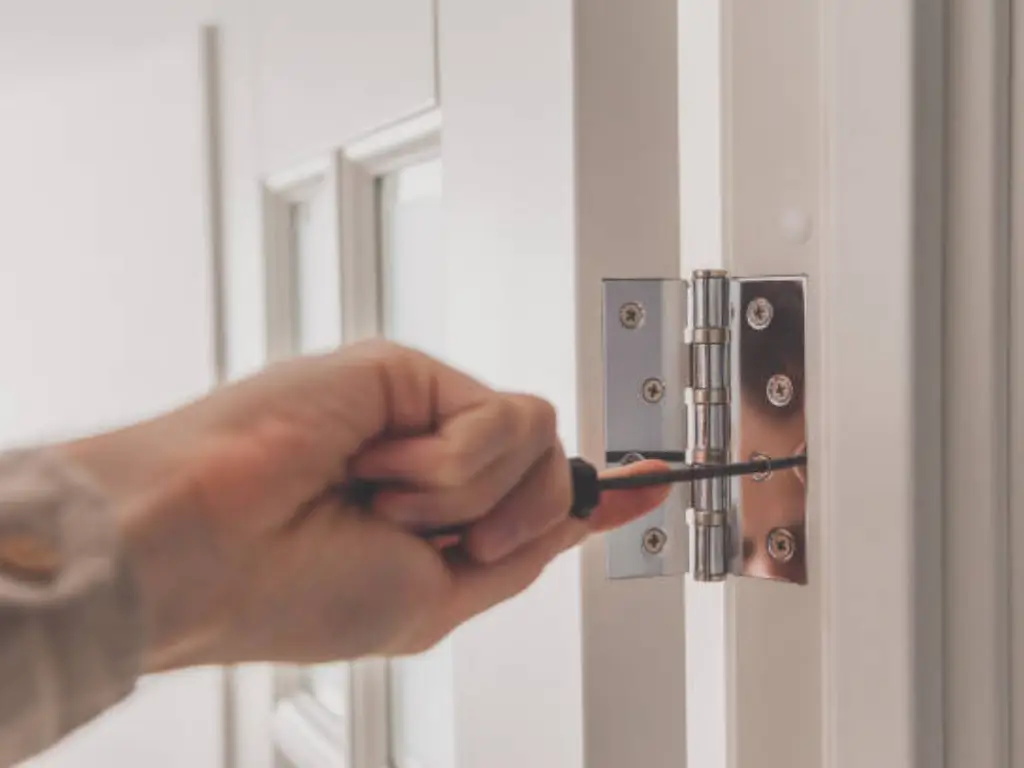
Step 4: Securing the Hinge with Screws

In its correct position, drill pilot holes for screws.The results after you drive in screws are important to prevent wood splitting at this stage. Ensure that every hinge plate is fittingly and firmly attached to both door and frame by use of screwdrivers.Driving screws straight and properly aligned may require some tools like a screw guide or self-centering bit.
Step 5: Attaching the Door to the Frame
At the time when you have finished fixing all the hinges into the door, lift it up and place it rightly in the frame. At this point, an extra pair of hands may be needed to help stabilize the door. After setting it straight, attach the door jamb’s hinges making sure that every screw is properly tightened for maximum steady and secure installation of your door.
Step 6: Testing the Door Swing
To test the swing of the door and look for any resistance or scraping sound, this is done by opening and closing it a few times. In case the door does not swing free or scrapes on the frame, it might be necessary to adjust hinge alignment or further tighten screws. After these adjustments, double check the alignment and use wood putty to fill any gaps or imperfections in the frame. Considering the weight of the door is also important as it affects how the hinges handle the load. This testing assures that installation was successful and the door works as expected.
How to Replace Door Hinges
Replacing door hinges is a straightforward process that can greatly improve the functionality and aesthetics of your door. Whether your existing hinges are worn out, rusty, or simply outdated, following these steps on how to replace door hinges will help you successfully complete the replacement process.
Step 1: Remove the Old Hinges
- Support the Door: If the door is very heavy, then use a door stop or shout for someone to help you hold the door.
- Unscrew the Hinges: Use a screwdriver to remove the hinge screws from the door edge first and the frame edge secondly. Begin from the top of the hinge and work your way down; this will help avoid falling of the door.
- Take Off the Door: Once you have unscrewed the hinges, you should then carefully pull the door off the door frame. Swing the door to the flat position for better working.
Step 2: Prepare the Hinges and Door
- Clean the Surface: Remove any debris or old paint from the hinge area on both the door and the frame to ensure a smooth installation.
- Check Mortises: Check the mortises that are to accommodate the hinges. If they are damaged or do not match the new hinges, you may need to adjust them with a chisel.
Step 3: Install the New Hinges
- Position the Hinges: Place the new hinges in position with the mortises on the door. Make sure they are flush and properly aligned with the edge of the door.
- Mark Screw Holes: With the new hinges, you should use a pencil to draw the positions of the screw holes.
- Drill Pilot Holes: If needed, pre-bore holes so that the wood does not crack when you are driving in the screws.
- Attach the Hinges: Attach the hinges to the door and then align the door to the frame to fix the hinges to the frame. Ensure that the screws are tightened to the right degree without over tightening them as this may cause the wood to crack.
Step 4: Test the Door Functionality
- Check Alignment: Once you have installed the new hinge(s), replace the door to its position and see how well it fits the frame. It should be possible to shut the door or open it without the door coming into contact with the adjacent frame.
- Make Adjustments: If necessary, the hinges can be shifted a little in order to achieve the best fit of all the components. This may include tightening or loosening of the screws as the case may be.
Step 5: Final Touches
- Lubricate Hinges: Where necessary, apply a lubricant on hinge pins to reduce friction.
- Fill Any Gaps: If you made adjustments to the mortises or left holes from the old hinges, fill them with wood filler or putty to create a finished look.
- Inspect the Installation: Finally, it is necessary to check simple operations of the door. Open and close the door a few times from the hinges and see if everything is working fine.
Tips for a Smooth Installation
To smoothly install door hinges proper planning and the right approach are needed. Start by selecting high quality hinges such as stainless steel, which are durable and tough for heavy doors. The drill bits should fit the screw heads readily without causing any stripping; a suitable chisel is also recommended. Properly marking the accurate position of hinges with a measuring tape can be done through diligent application of it so that you get not misaligned ones. Many unnecessary corrections afterwards can be avoided if you take your time in this stage. At the same time, rushing through an easy task like this could turn it into a frustrating affair, possibly endangering smooth running of your door and its appeal.
When fitting a new door ensure that measurements beginning from top to bottom hinge are done on point. Consider the side of the door swing to determine the direction the hinges need to be aligned. A self-centering bit is very useful when you want to drill starter holes that go straight into the wood potentially allowing screws to sit completely within them and strongly hold onto the hinge itself. Moreover, cleaning out splinters or roughness around cutouts using a utility knife before setting up hinge plates will ensure they lie flat against the side of the door as well as jamb edges. When preparing with precision using correct devices, fixing becomes easier while at the same time improving appearance and usability of your door too.
Troubleshooting Common Issues
Even the most careful installation can run into problems, hence it is important to keep some of the common issues in mind for effective use for a long time. It is very important to know how the hinges on a door should be fitted to avoid such problems. If, for example, the way a door hangs is awkward or it will not manage to swing properly, it can be explained by the facts of the locations of hinge holes being wrongly placed or the door jambs being too crooked. In other cases, remeasurement, even in such seemingly simple operations as adjustment of the screw locations or the hinge plates, or both may be needed. When securing screws is ineffective, they may need to be longer, or thin wood dowelling glued into the screw-hole may be required particularly where the doors are old and the timber has become soft and rotten in places.
The other complication is when the door rubs on the frame or does not close at all. Adjusting hinge pins and sides of hinges slightly can correct bad positions of doors. Sticking or squeaking doors can be made easier by applying grease to the hinge pin lube so that it is easier to move. In case this continues happening take a metal scraper and gently remove any excess wood from bottom of the door frame for a smoother operation. Do not forget to check your work once more; slight adjustments may be necessary. This will lead to your door looking good and functioning well for years and hence the need for repairs or replacements will not be there.
FAQs
- What type of hinge is best for my door?
To make an educated guess of which hinge is best, consider the weight of the door and how it will be used. In households, most interior doors are supported by butt hinges, although heavy doors can have ball overhead bearing hinges such designs reduce friction. In areas of heavy door usage where automatic closing is needed, spring hinges work quite well.
- How far should hinges be placed from the edges of the door?
It is widely regarded that the top edge would be 10 inches away from the top section of the door, and 10 inches away from the bottom section should be the bottom edge. These are some common stipulations regarding the number of hinges as well as placement with few exceptions, if a third is needed or wanted it can be place anywhere central to both the top and bottom ones.
- How can I ensure my door swings smoothly after installation?
When you are done replacing door hinges, the next step is to move the door by opening and shutting it several times. In case the door seems a bit resistant and does not open easily, you may want to check the strap or the hinge pins and put some oil on them if required. It is also important to learn how to install hinges on a door properly to avoid obstacles. Some hinges will definitely need fine adjustments for optimum use.
Conclusion
The ability to fix door hinges is an important skill that can help you save time and make your home more effective. Understanding hinge placement on the door is crucial for achieving optimal functionality. If you go through these guidelines carefully on how to install hinges, your doors will not only look good but they will also function well. Keep in mind, this process requires accuracy, diligence, and appropriate tools. Selecting the right hinge for your door is essential for a professional-looking installation that can last long. By following these steps, you will ensure that your doors operate smoothly and look great.


